


We’re here to shed a little light on how you can host and configure your multiple application projects on Upsun with this step-by-step guide. The goal is to enable your team to focus more on creating incredible user experiences and less on multi-application infrastructure management—as well as a few multi-application development tips along the way.
We’re going to look at this through the lens of a customer looking for multi-application hosting with a few specific constraints. These constraints are:
- A backend using API Platform Admin component
- A legacy frontend, hosting an API and a corporate frontend, developed with Symfony 6.2
- A white label frontend developed with Gatsby, consuming the "Legacy" API
- A Mercure Rocks server for marketing purposes (push notifications)
- All customer sources on a public GitHub repo
How to start hosting your multi-application project with Upsun
Creating a fork of BigFoot multi-app repository
To be able to perform the following steps in this process, you first need to create your own repository—a Fork—using an Upsun example. To do so, simply follow the steps in this Github article to create a fork from our BigFoot multi-app project to your own Github organization. This Bigfoot multi-app project has a backend using API Platform, a frontend+API using Symfony, a white label frontend using Gatsby, and a Mercure Rocks server.
After creating your fork, clone it locally and open it in your favorite integrated development environment (IDE).
git clone https://github.com/<YourOrgName>/upsun_multi-app-example bigfoot-multiapp
cd bigfoot-multiapp
Then remember to replace the <YourOrgName> value with your own Github organization.
Configure your project
To host your multi-application project on Upsun, a YAML configuration— config.yaml—is needed in your source code to manage the way your application behaves. This YAML configuration file is located in a .upsun/ folder, at the root of your source code, the architecture of which will look like this:
bigfoot-multiapp
├── .upsun
│   └── config.yaml
└── <project sources>
To configure your multi-application project, there are a few basic rules:
- YAML format is used for config files.
- The .upsun/ folder, containing a config.yaml file, with routing, services, and application configuration shared across all applications needs to stay at the root of your project.
- Each app is located in a dedicated folder:
- admin: API Platform Admin component
- api: BigFoot API and default frontend
- gatsby: Gatsby frontend
- mercure: Mercure Rocks Server
Upsun YAML configuration is located in the .upsun/ folder and can be automatically populated using the upsun project:init command, see below:
├── .upsun
│   └── config.yaml
└── <project sources>
This command generated a .upsun/config.yaml file, based on your local stack, and it contains 3 top-level YAML keys:
applications: this contains the list of your application definitionservices: this contains the list of your service definitionroutes: this contains the list of your route definition
Create .upsun/config.yaml file
To configure your project, you first need to create a new .upsun/config.yaml file with the following first top-level YAML keys:
# .upsun/config.yaml
applications:
services:
routes:
Then commit your newly configured file:
git add .upsun/config.yaml
git commit -m "init Upsun configuration"
git push
Now, let’s configure our four applications one by one:
Configure the API application
First, we need to configure the applications’ top-level key with the behavior of our Symfony BigFoot application, named api.
# .upsun/config.yaml
# Complete list of all available properties: https://docs.upsun.com/create-apps/app-reference.html
applications:
  # A unique name for the app
  api:
    # Information on the app's source code and operations that can be run on it.
    source:
      # The path where the app code lives. Defaults to the directory of the .upsun/config.yaml file. Useful for multi-app setups.
      root: api
    # The runtime the application uses.
    type: php:8.3
    # The relationships of the application with services or other applications.
    relationships:
      database: "database:postgresql"
    # Mounts define directories that are writable after the build is complete. If set as a local source, disk property is required.
    mounts:
      "/var/cache": { source: storage, source_path: files/cache  }
      "/var/log": { source: storage, source_path: files/log  }
      "/var/sessions": { source: storage, source_path: files/sessions  }
      "/data": { source: storage, source_path: files/data  }
    # The web key configures the web server running in front of your app.
    web:
      # Each key in locations is a path on your site with a leading /.
      locations:
        "/":
          root: "public"
          passthru: '/index.php'
          index:
            - index.php
          scripts: true
          allow: true
          headers:
            Access-Control-Allow-Origin: "*"
    # Variables to control the environment.
    variables:
      env:
        APP_ENV: 'prod'
      php:
        assert.active: off
        #opcache.preload: config/preload.php
    # Specifies a default set of build tasks to run. Flavors are language-specific.
    build:
      flavor: composer
    # Installs global dependencies as part of the build process.
    # Hooks allow you to customize your code/environment as the project moves through the build and deploy stages
    hooks:
      # The build hook is run after any build flavor.
      build: |
        set -x -e
        curl -s https://get.symfony.com/cloud/configurator | bash
        symfony-build
      # The deploy hook is run after the app container has been started, but before it has started accepting requests.
      deploy: |
        set -x -e
        symfony-deploy
    # Scheduled tasks for the app.
    crons:
      update-sighting:
        spec: '*/5 * * * *'
        cmd: './bin/console app:update-sighting-scores'
      security-check:
        # Check that no security issues have been found for PHP packages deployed in production
        # See https://github.com/fabpot/local-php-security-checker
        spec: '50 23 * * *'
        cmd: if [ "$PLATFORM_ENVIRONMENT_TYPE" = "production" ]; then croncape php-security-checker; fi
    # Customizations to your PHP or Lisp runtime.
    runtime:
      extensions: [ ctype, iconv, apcu, mbstring, sodium, xsl, pdo_pgsql ]
You probably noticed that our api application has a relationship with a service called database, see the YAML configuration below. This means we need to declare this service database.
applications:
  api:
    ...
    relationships:
      database: "database:postgresql"
Still, in the same .upsun/config.yaml file, let's define this service in the services top-level YAML key:
# .upsun/config.yaml
applications:
  api: ...
# The services of the project.
#
# Each service listed will be deployed
# to power your Upsun project.
# More information: https://docs.upsun.com/add-services.html
# Full list of available services: https://docs.upsun.com/add-services.html#available-services
services:
  database:
    type: postgresql:15
Finally, we need to define the routing for our API application in the same .upsun/config.yaml file, to do so add the following:
# .upsun/config.yaml
applications:
  api: …
services: …
routes:
  # BigFoot API
  https://{default}:
    type: upstream
    # the first part should be your project name
    upstream: "api:http"
    id: api
Then, we need to configure the environment variables, specific to Upsun for the api application. Please create an api/.environment file. When present, this file will be sourced in the applications’ environment.
# api/.environment
export N_PREFIX=$HOME/.n
export PATH=$N_PREFIX/bin:$PATH

# Set dynamic CORS_ALLOW_ORIGIN for NelmioBundle
export CORS_ALLOW_ORIGIN=.*$(echo $PLATFORM_PROJECT)..*.platformsh.site
export TRUSTED_HOSTS=.*$(echo $PLATFORM_PROJECT)..*.platformsh.site
export TRUSTED_PROXIES=.*$(echo $PLATFORM_PROJECT)..*.platformsh.site

# Admin Site Name
export API_SITE_NAME="API Platform"

export APP_SECRET=$(echo $PLATFORM_PROJECT_ENTROPY)

# Mercure Rocks uri
export MERCURE_URL=$(echo $PLATFORM_ROUTES | base64 --decode | jq -r 'to_entries[] | select(.value.id == "mercure") | .key'| awk '{print substr($0, 0, length($0))}')
export MERCURE_PUBLIC_URL=$(echo $PLATFORM_ROUTES | base64 --decode | jq -r 'to_entries[] | select(.value.id == "mercure") | .key'| awk '{print substr($0, 0, length($0))}')
export MERCURE_PUBLISH_URL=$(echo $PLATFORM_ROUTES | base64 --decode | jq -r 'to_entries[] | select(.value.id == "mercure") | .key'| awk '{print substr($0, 0, length($0))}')

# The secret used to sign the JWTs
export MERCURE_JWT_SECRET="!ChangeThisMercureHubJWTSecretKey!"
You can then commit your configuration file to your Git repository:
git add .upsun/config.yaml api/.environment
git commit -m "adding api configuration for Upsun"
git push
Configure the Admin application
Secondly, we need to configure the applications top-level key with the behavior of our API Platform Admin component, named admin. To configure your admin application, add the applications.admin block in your .upsun/config.yaml file:
# .upsun/config.yaml
applications:
  api: …
  # A unique name for the app
  admin:
    # Information on the app's source code and operations that can be run on it.
    source:
      # The path where the app code lives. Defaults to the directory of the .upsun/config.yaml file. Useful for multi-app setups.
      root: admin
    # The runtime the application uses.
    type: nodejs:20
    # How many resources to devote to the app. If not set, default to the predefined runtime definition.
    # For more information, please see https://docs.upsun.com/manage-resources/adjust-resources.html#advanced-container-profiles
    container_profile: BALANCED
    # Mounts define directories that are writable after the build is complete. If set as a local source, disk property is required.
    mounts:
      '/.tmp_platformsh': { source: "storage", source_path: "files/tmp_platformsh" }
      '/build': { source: "storage", source_path: "files/build" }
      '/.cache': { source: "storage", source_path: "files/.cache" }
      '/node_modules/.cache': { source: "storage", source_path: "files/node_modules/.cache" }
    # The web key configures the web server running in front of your app.
    web:
      # Each key in locations is a path on your site with a leading /.
      locations:
        "/admin":
          root: "build"
          passthru: "/admin/index.html"
          index:
            - "index.html"
          expires: 300s
          scripts: true
          allow: false
          rules:
            .(css|js|gif|jpe?g|png|ttf|eot|woff2?|otf|html|ico|svg?)$:
              allow: true
            ^/admin/robots.txt$:
              allow: true
            ^/admin/manifest.json$:
              allow: true
            ^/admin/_next:
              allow: true
            ^/admin/sitemap:
              allow: true
          headers:
            Access-Control-Allow-Origin: "*"
    # Variables to control the environment.
    variables:
      env:
        NODE_OPTIONS: '--max-old-space-size=1536'
    # Specifies a default set of build tasks to run. Flavors are language-specific.
    build:
      flavor: none
    # Hooks allow you to customize your code/environment as the project moves through the build and deploy stages
    hooks:
      # The build hook is run after any build flavor.
      build: |
        set -eu
        corepack yarn install --immutable --force
      # The post_deploy hook is run after the app container has been started and after it has started accepting requests.
      post_deploy: |
        corepack yarn build
As you probably noticed, the applications.admin.web.locations is defined on /admin. This means that the admin will be reachable on <defaultUrl>/admin. We need to define the corresponding route in the same .upsun/config.yaml file, into the routes top-level YAML key:
applications:
  api: ...
  admin: ...
services: ...
routes:
  # BigFoot API
  https://{default}: …

  # API Platform Admin component
  https://{default}/admin:
    type: upstream
    # the first part should be your project name
    upstream: "admin:http"
    id: "admin"
    cache:
      cookies: [ '*' ]
      default_ttl: 0
      enabled: true
      headers: [ Accept, Accept-Language ]
    ssi:
      enabled: false
Then, we need to configure the environment variables, specific to Upsun for the admin application, which leverages the pre-installed tool jq. Please create an admin/.environment file.
# admin/.environment
export REACT_APP_PUBLIC_URL=$(echo $PLATFORM_ROUTES | base64 --decode | jq -r 'to_entries[] | select(.value.id == "api") | .key')api
export PUBLIC_URL=$(echo $PLATFORM_ROUTES | base64 --decode | jq -r 'to_entries[] | select(.value.id == "admin") | .key')

# Admin Site Name
export REACT_APP_ADMIN_SITE_NAME="Admin API Upsun"
You can then commit your configuration file to your Git repository:
git add .upsun/config.yaml admin/.environment
git commit -m "adding admin configuration for Upsun"
git push
Configure the Gatsby application
Thirdly, we need to configure the applications' top-level key with the behavior of our white label frontend—named gatsby—developed using the Gatsby stack.
# .upsun/config.yaml
applications:
  api: ...
  admin: ...

  # A unique name for the app
  gatsby:
    # Information on the app's source code and operations that can be run on it.
    source:
      # The path where the app code lives. Defaults to the directory of the .upsun/config.yaml file. Useful for multi-app setups.
      root: gatsby
    # The runtime the application uses.
    type: 'nodejs:20'
    # How many resources to devote to the app. If not set, default to the predefined runtime definition.
    # For more information, please see https://docs.upsun.com/manage-resources/adjust-resources.html#advanced-container-profiles
    container_profile: BALANCED

    # Mounts define directories that are writable after the build is complete. If set as a local source, disk property is required.
    mounts:
      '/.cache': { source: "storage", source_path: "cache" }
      '/.config': { source: "storage", source_path: "config" }
      '/public': { source: "storage", source_path: "public" }
    # The web key configures the web server running in front of your app.
    web:
      # Each key in locations is a path on your site with a leading /.
      locations:
        '/site':
          root: 'public'
          index: [ 'index.html' ]
          scripts: false
          allow: true
    # Variables to control the environment.
    variables:
      env:
       NODE_OPTIONS: --max-old-space-size=1536
    # Specifies a default set of build tasks to run. Flavors are language-specific.
    build:
      flavor: none
    # Installs global dependencies as part of the build process.
    dependencies:
      nodejs:
        yarn: "1.22.17"
   # Hooks allow you to customize your code/environment as the project moves through the build and deploy stages
    hooks:
      # The build hook is run after any build flavor.
      build: |
        set -e
        yarn --frozen-lockfile
      # The post_deploy hook is run after the app container has been started and after it has started accepting requests.
      post_deploy: |
        yarn build --prefix-paths
As you probably noticed, the applications.gatsby.web.locations is defined on /site. This means that the Gatsby will be reachable on <defaultUrl>/site and we need to define the corresponding route in the same .upsun/config.yaml file, into the routes top-level YAML key:
applications:
  api: ...
  admin: ...
services:
  ...
routes:
  # BigFoot API
  https://{default}: ...
  # API Platform Admin component
  https://{default}/admin: ...

  # Gatsby App
  https://{default}/site:
    type: upstream
    # the first part should be your project name
    upstream: "gatsby:http"
The gatsby app is consuming our BigFoot api REST API. If you look at the gatsby source code, in the gatsby/gatsby-config.js file, you’ll find the route to your api app by using process.env.PLATFORM_ROUTES meaning we don’t need a gatsby/.environment file to find this route. You can then commit your configuration file to your Git repository:
git add .upsun/config.yaml
git commit -m "adding gatsby configuration for Upsun"
git push
Configure the Mercure application
The API Platform Admin component, made by Les Tilleuls, communicates with a Mercure.rocks server—a GO stack used for real-time push communication. We need to configure the applications top-level key with the behavior of a standalone Mercure.rocks server, named mercure.
# .upsun/config.yaml
applications:
  api: ...
  admin: ...
  gatsby: ...

  # A unique name for the app
  mercure:
    # Information on the app's source code and operations that can be run on it.
    source:
      # The path where the app code lives. Defaults to the directory of the .upsun/config.yaml file. Useful for multi-app setups.
      root: mercure/.config
    # The runtime the application uses.
    type: golang:1.21
    # Mounts define directories that are writable after the build is complete. If set as a local source, disk property is required.
    mounts:
      "database": { source: "storage", source_path: "database" }
      "/.local": { source: "storage", source_path: ".local" }
      "/.config": { source: "storage", source_path: ".config" }
    # The web key configures the web server running in front of your app.
    web:
      # Commands are run once after deployment to start the application process.
      commands:
        # The command to launch your app. If it terminates, it's restarted immediately.
        start: ./mercure run --config Caddyfile.upsun
    # Each key in locations is a path on your site with a leading /.
    locations:
      /:
        passthru: true
        scripts: false
        allow: true
        request_buffering:
          enabled: false
        headers:
          Access-Control-Allow-Origin: "*"
    # Variables to control the environment.
    variables:
      env:
        MERCUREVERSION: 0.14.4
        SERVER_NAME: ":8888"
        MERCURE_TRANSPORT_URL: "bolt:///var/run/mercure.db?size=1000&cleanup_frequency=0.5"
        MERCURE_EXTRA_DIRECTIVES: |
          cors_origin *
          publish_origins *
          subscriptions
          demo
        GLOBAL_OPTIONS: |
          auto_https off
        MERCURE_PUBLISHER_JWT_KEY: "!ChangeThisMercureHubJWTSecretKey!"
        MERCURE_SUBSCRIBER_JWT_KEY: "!ChangeThisMercureHubJWTSecretKey!"
    # Specifies a default set of build tasks to run. Flavors are language-specific.
    build:
      flavor: none
    # Hooks allow you to customize your code/environment as the project moves through the build and deploy stages
    hooks:
      # The build hook is run after any build flavor.
      build: |
        # Install Mercure using cache
        FILE="mercure_${MERCUREVERSION}_Linux_x86_64.tar.gz"
        if [ ! -f "$PLATFORM_CACHE_DIR/$FILE" ]; then
          URL="https://github.com/dunglas/mercure/releases/download/v${MERCUREVERSION}/$FILE"
          wget -O "$PLATFORM_CACHE_DIR/$FILE" $URL
       else
         echo "Found $FILE in cache, using cache"
       fi
       file $PLATFORM_CACHE_DIR/$FILE
       tar xvzf $PLATFORM_CACHE_DIR/$FILE
For the Mercure app routing, we will use a sub\domain of the default URL of your environment (to complete the discovery of Upsun routing). This means that the Mercure app will be reachable on mercure.<defaultUrl>.
So, we need to define the corresponding route in the same .upsun/config.yaml file, into the routes top-level YAML key:
applications:
  api: ...
  admin: ...
  gatsby: ...
  mercure: ...
services: ...
routes:
  # BigFoot API
  https://{default}: ...
  # API Platform Admin component
  https://{default}/admin: ...
  # Gatsby App
  https://{default}/site: ...

  # Mercure Rocks app
  https://mercure.{default}:
    type: upstream
    # the first part should be your project name
    upstream: "mercure:http"
    cache:
      enabled: false
You can then commit your configuration file to your Git repository:
git add .upsun/config.yaml
git commit -m "adding mercure configuration for Upsun"
git push
Et voilà, your project is ready to be pushed to Upsun! You can check out the final result of a .upsun/config.yaml file here for reference.
Create an Upsun project
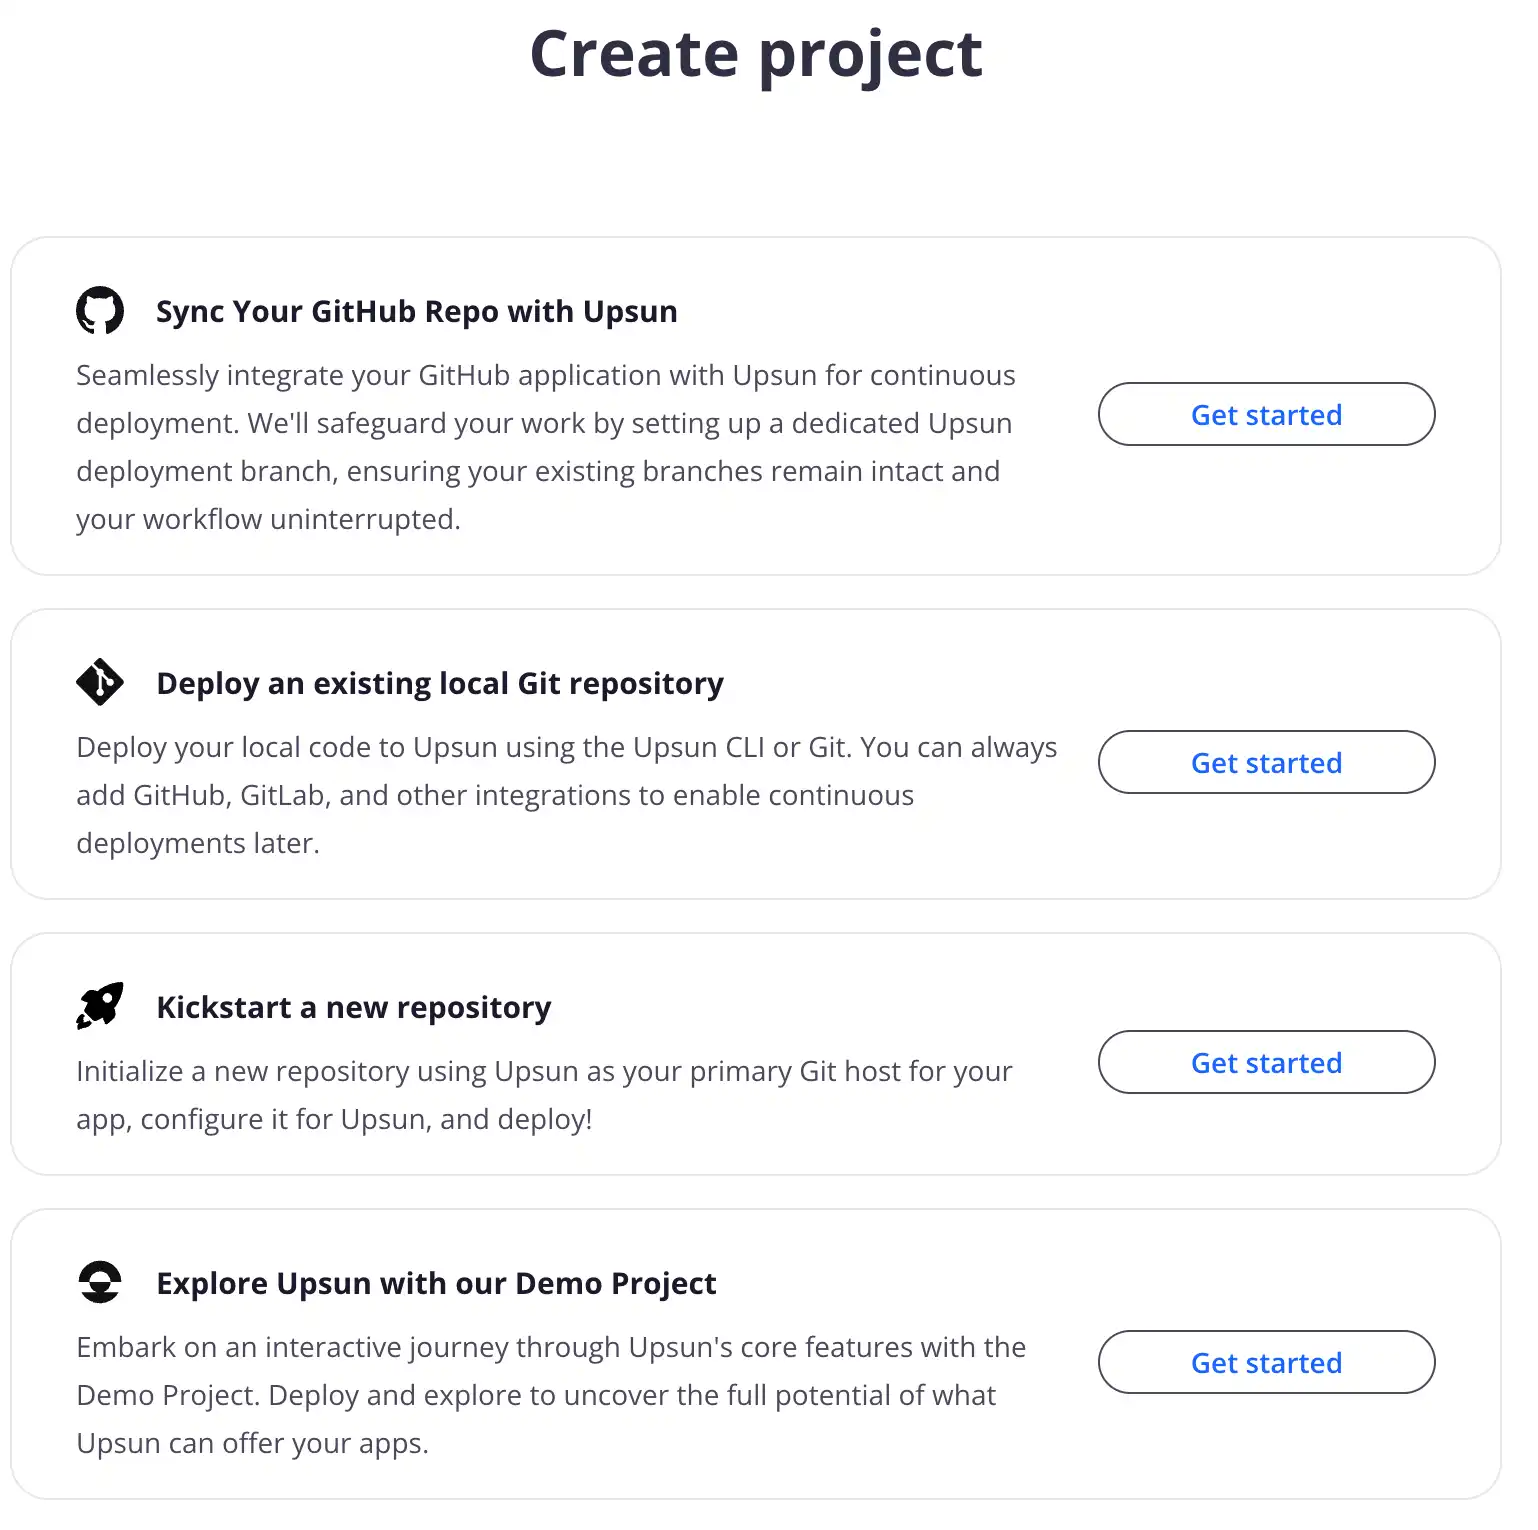
The next step in setting up this multi-app project on Upsun is to create a project that is simple to do via the Console. On your Console homepage (all projects), in the top right corner, please click on the create project button, as seen below:


If you do not already have an organization created to put the project into, you’ll first be instructed to create one. Once you have done so, select that organization from the dropdown, and then select Sync Your GitHub Repo with Upsun, as seen in the screen below:

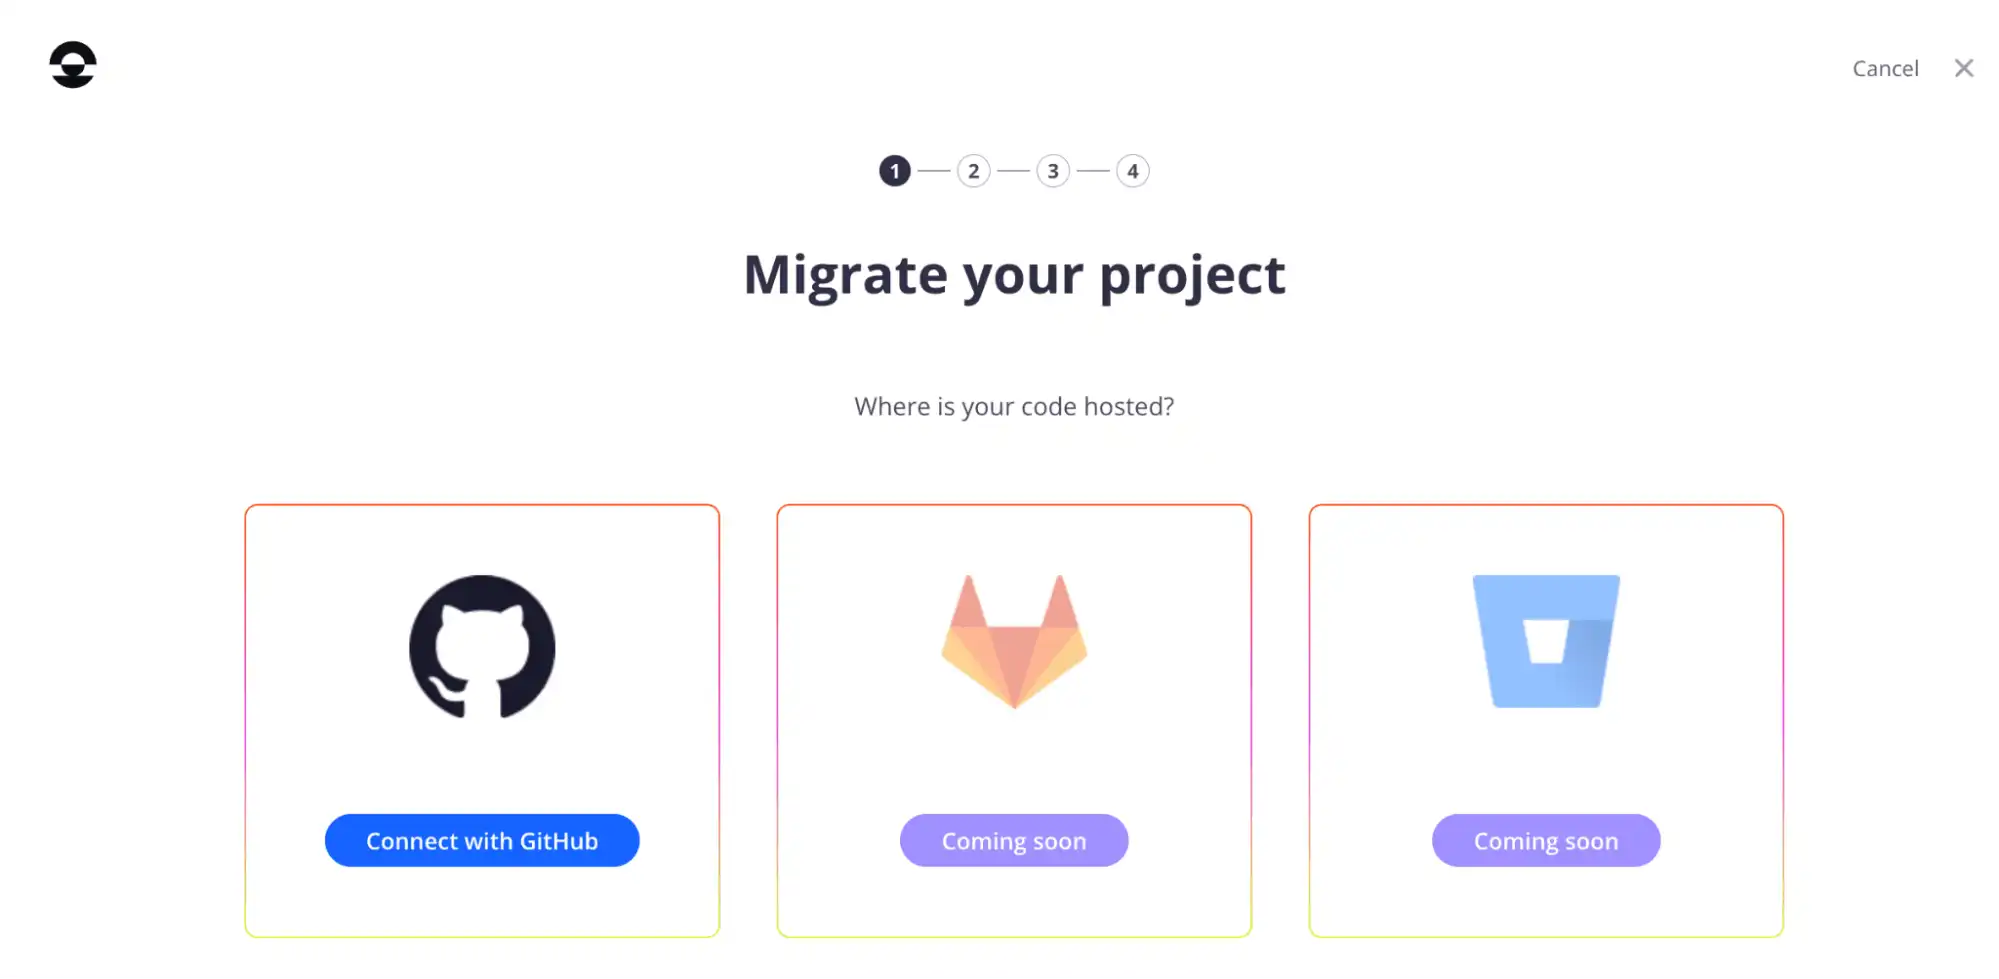
Then select connect with GitHub from the options provided as seen here:

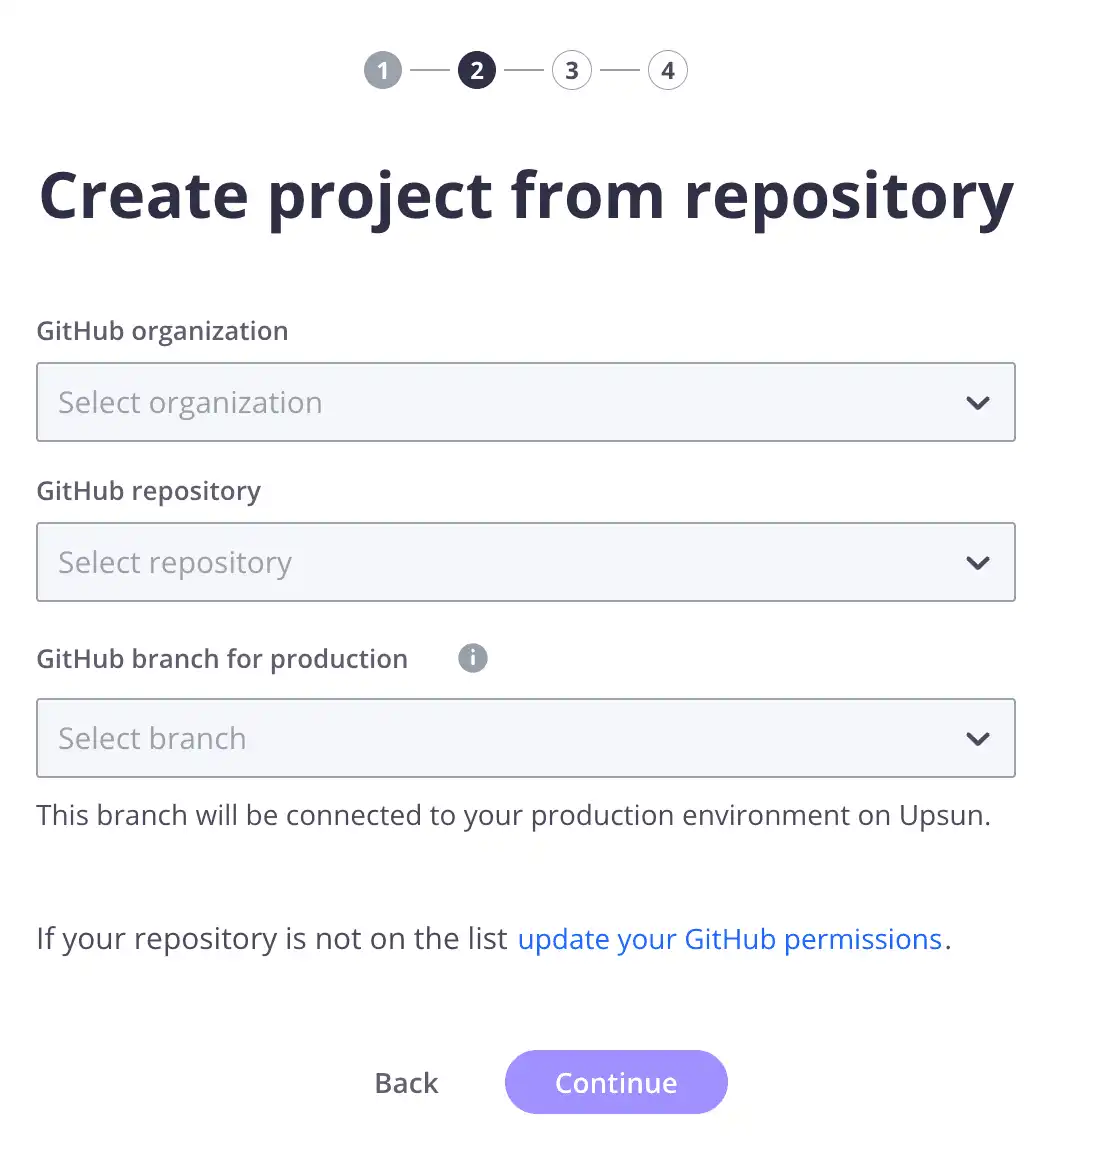
In the next form that appears as seen in the screen below, select your GitHub organization from the first dropdown and then select install and authorize and fill out the GitHub credentials. You will need to select your GitHub organization and previously created GitHub repository and the production branch and select continue.

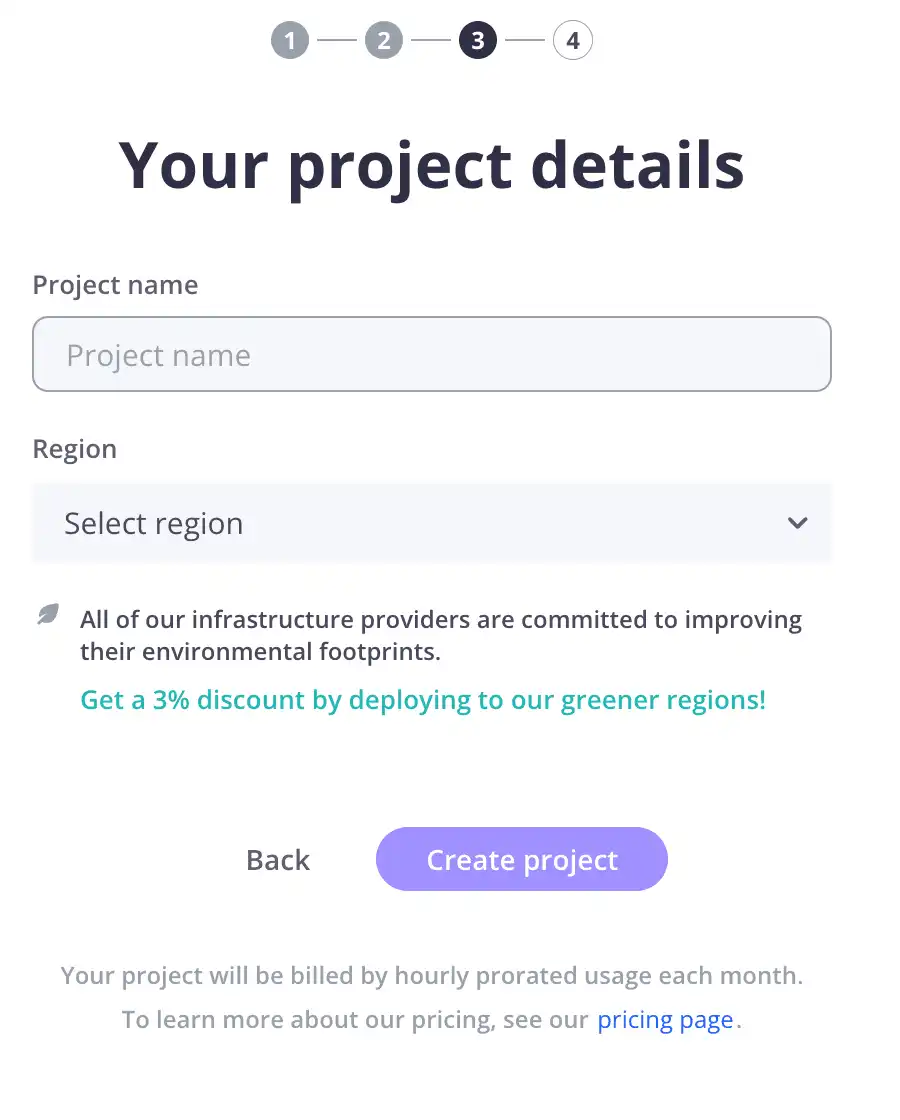
You will then be taken to step three of this setup—as seen below—where you will fill in various details including project name, environment name, and region. Once you’ve done so, select create project.

On the next page, while the project creation process is ongoing in the background, you will see on the left some further setup instructions, if you need them. On the right, you can follow the project creation process and you will be informed when it is complete, as seen in the screen below:

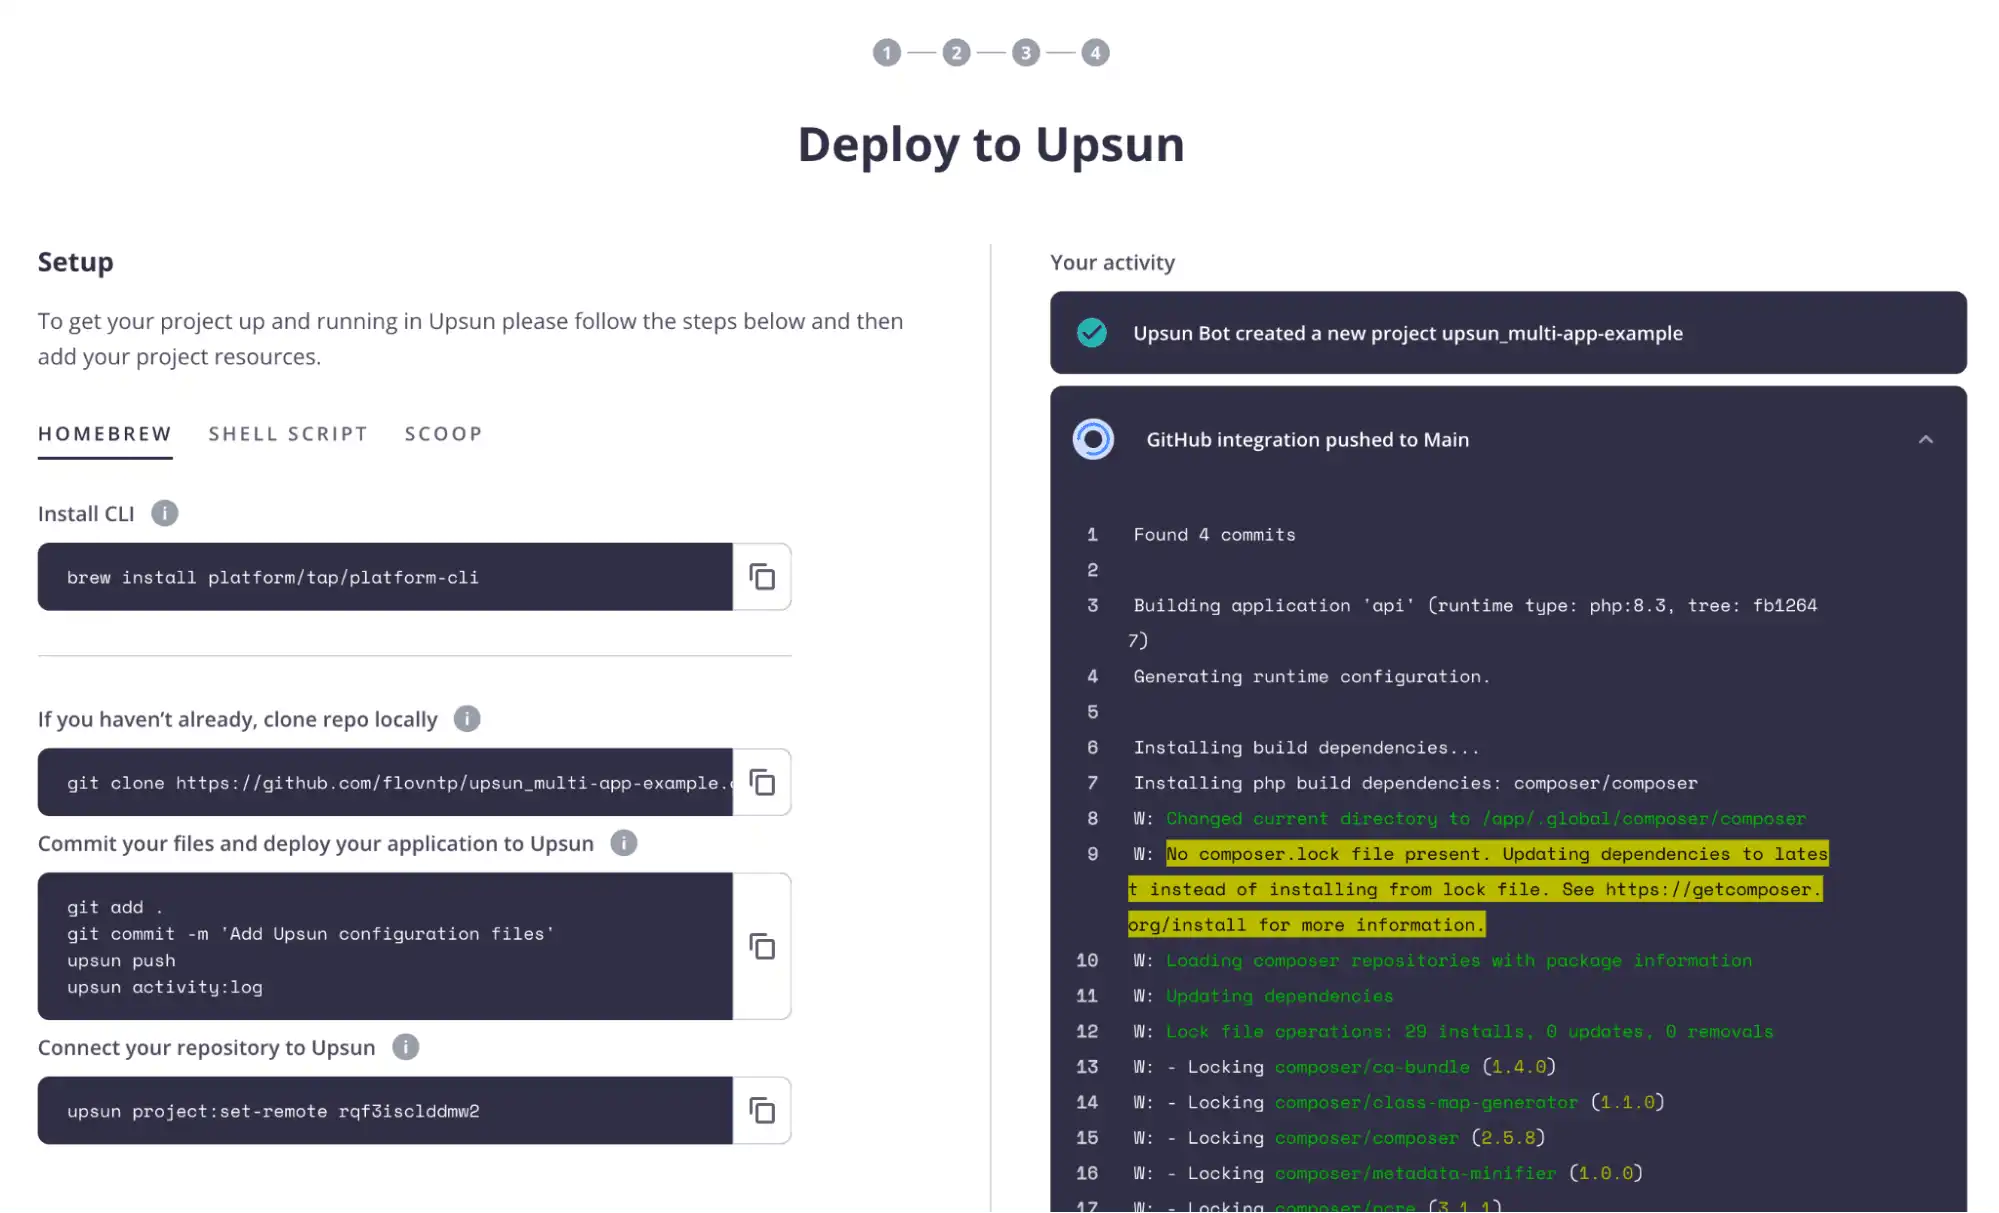
Once your project has been created, the GitHub integration process will automatically deploy your application based on your GitHub repository source code. Wait for the integration to finish deployment and it will then display your application information which you can see an example of in the screen below:

Time to deploy, right?
And just like that, it’s time to deploy! But wait…
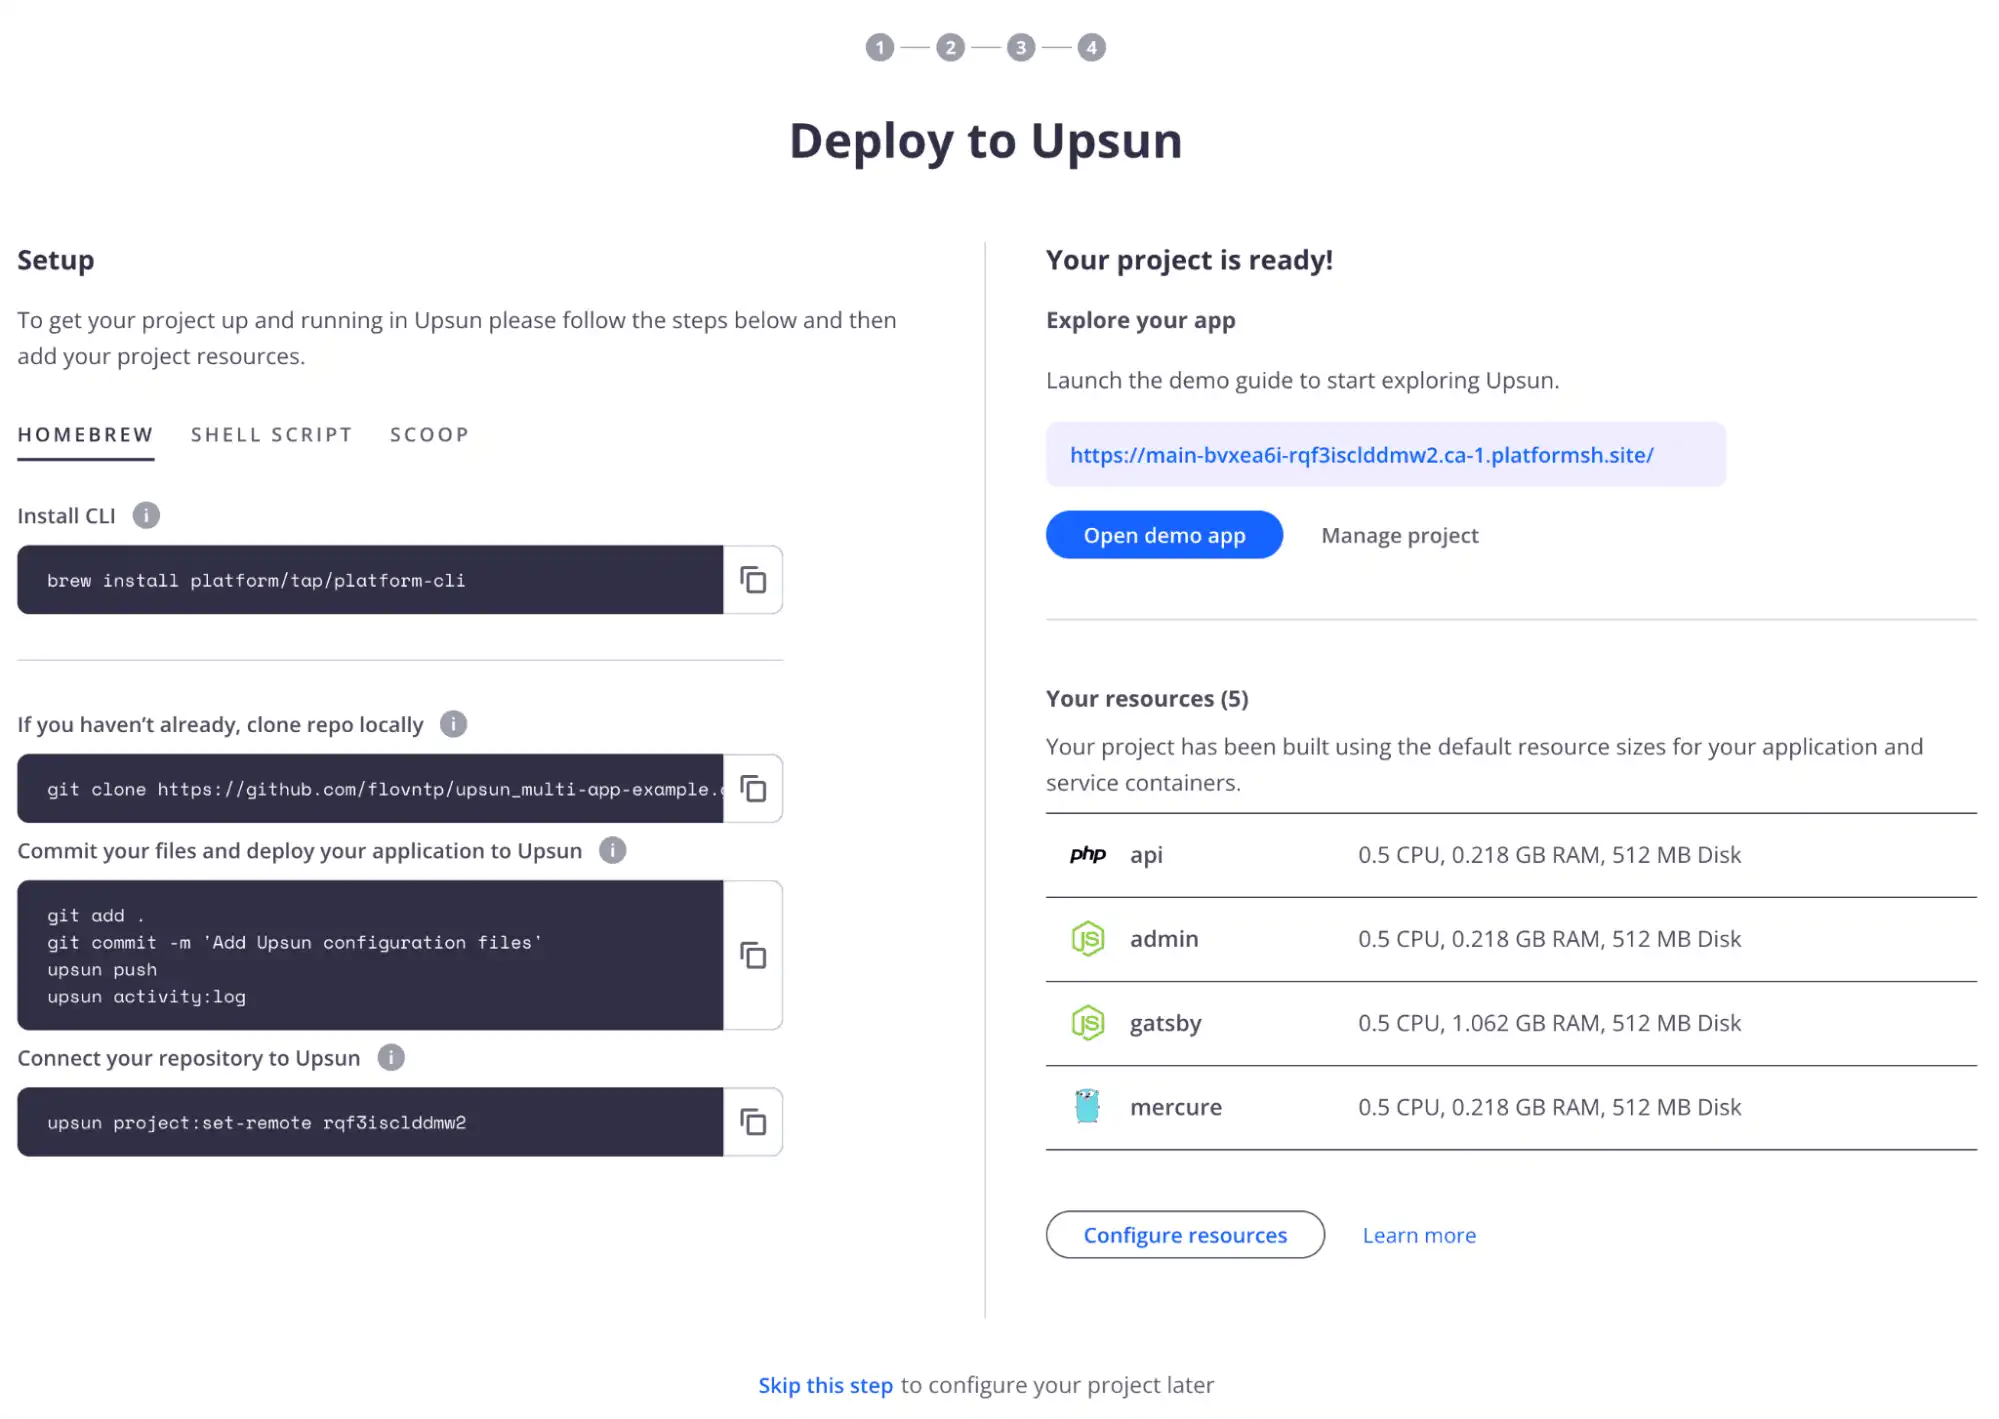
As you already ensured your source code was Upsun-ready in the project configuration section of this guide, your project will have been automatically deployed during project creation and your application will already be live, with no deployment needed. Check out your new project URL at the bottom of the console interface.
The next step is to access your project console by clicking on the view project button at the bottom of the setup page, et voilà, your multiple application project is live and you can start playing around with it and adding lots of cool new features!
Set a remote to your Upsun project
To ease interaction from your terminal with your Upsun project, you need to set a remote using this CLI command:
upsun project:set-remote <projectID>Populate the data
The Bigfoot app (API app) contains fixtures that could be populated into the database. To do so, complete the following commands:
upsun ssh --app=api "php bin/console d:s:u --dump-sql --force"
upsun ssh --app=api "php bin/console d:f:load -e dev"
View the deployed sites
Your multiple applications project is now live and you should test it. To open one of your websites, you can either use the Console interface or use the following CLI command and then choose one of the listed routes:
upsun environment:urlCreate a staging environment
To create a new environment on our project, we need to create a new Git branch, push it to the Github repository, and then the Github integration process will automatically create the environment. To do so, complete the following commands:
git checkout -b staging
git push --set-upstream origin staging
Remember that each time you create and push a new Git branch, GitHub integration generates a new inactive environment within your Upsun project. As the environment is inactive by default, you need to activate it to deploy it by doing the following:
upsun environment:info type staging
upsun environment:activate stagingCreate a dev environment
Now it’s time to create a new dev environment by creating a new Git branch from the staging environment by doing the following:
git checkout -b dev
git push --set-upstream origin dev
Remember that each time you create and push a new Git branch, GitHub integration generates a new inactive environment within your Upsun project. As the environment is inactive by default, you need to activate it to deploy it:
upsun environment:info type development
upsun environment:activate dev
And the Git guides don’t stop there, stay tuned for our next article on Git submodules coming very soon. Remain up-to-date on the latest from us over on our social media and community channels: Dev.to, Reddit, and our Community.
Your greatest work
is just on the horizon

Join our monthly newsletter
Compliant and validated