


Features


WebSockets are a communication protocol that enables real-time communication between the client and the server. WebSockets keep the connection alive and allow bi-directional communication. This makes WebSockets suitable for chat and stock market applications, multiplayer games, and collaborative tools.
In this article, we'll explore how the WebSocket protocol works and the advantages of using it over HTTP. We'll also show you how to create a simple chat application using WebSockets in the frontend and backend.
HTTP vs. WebSockets
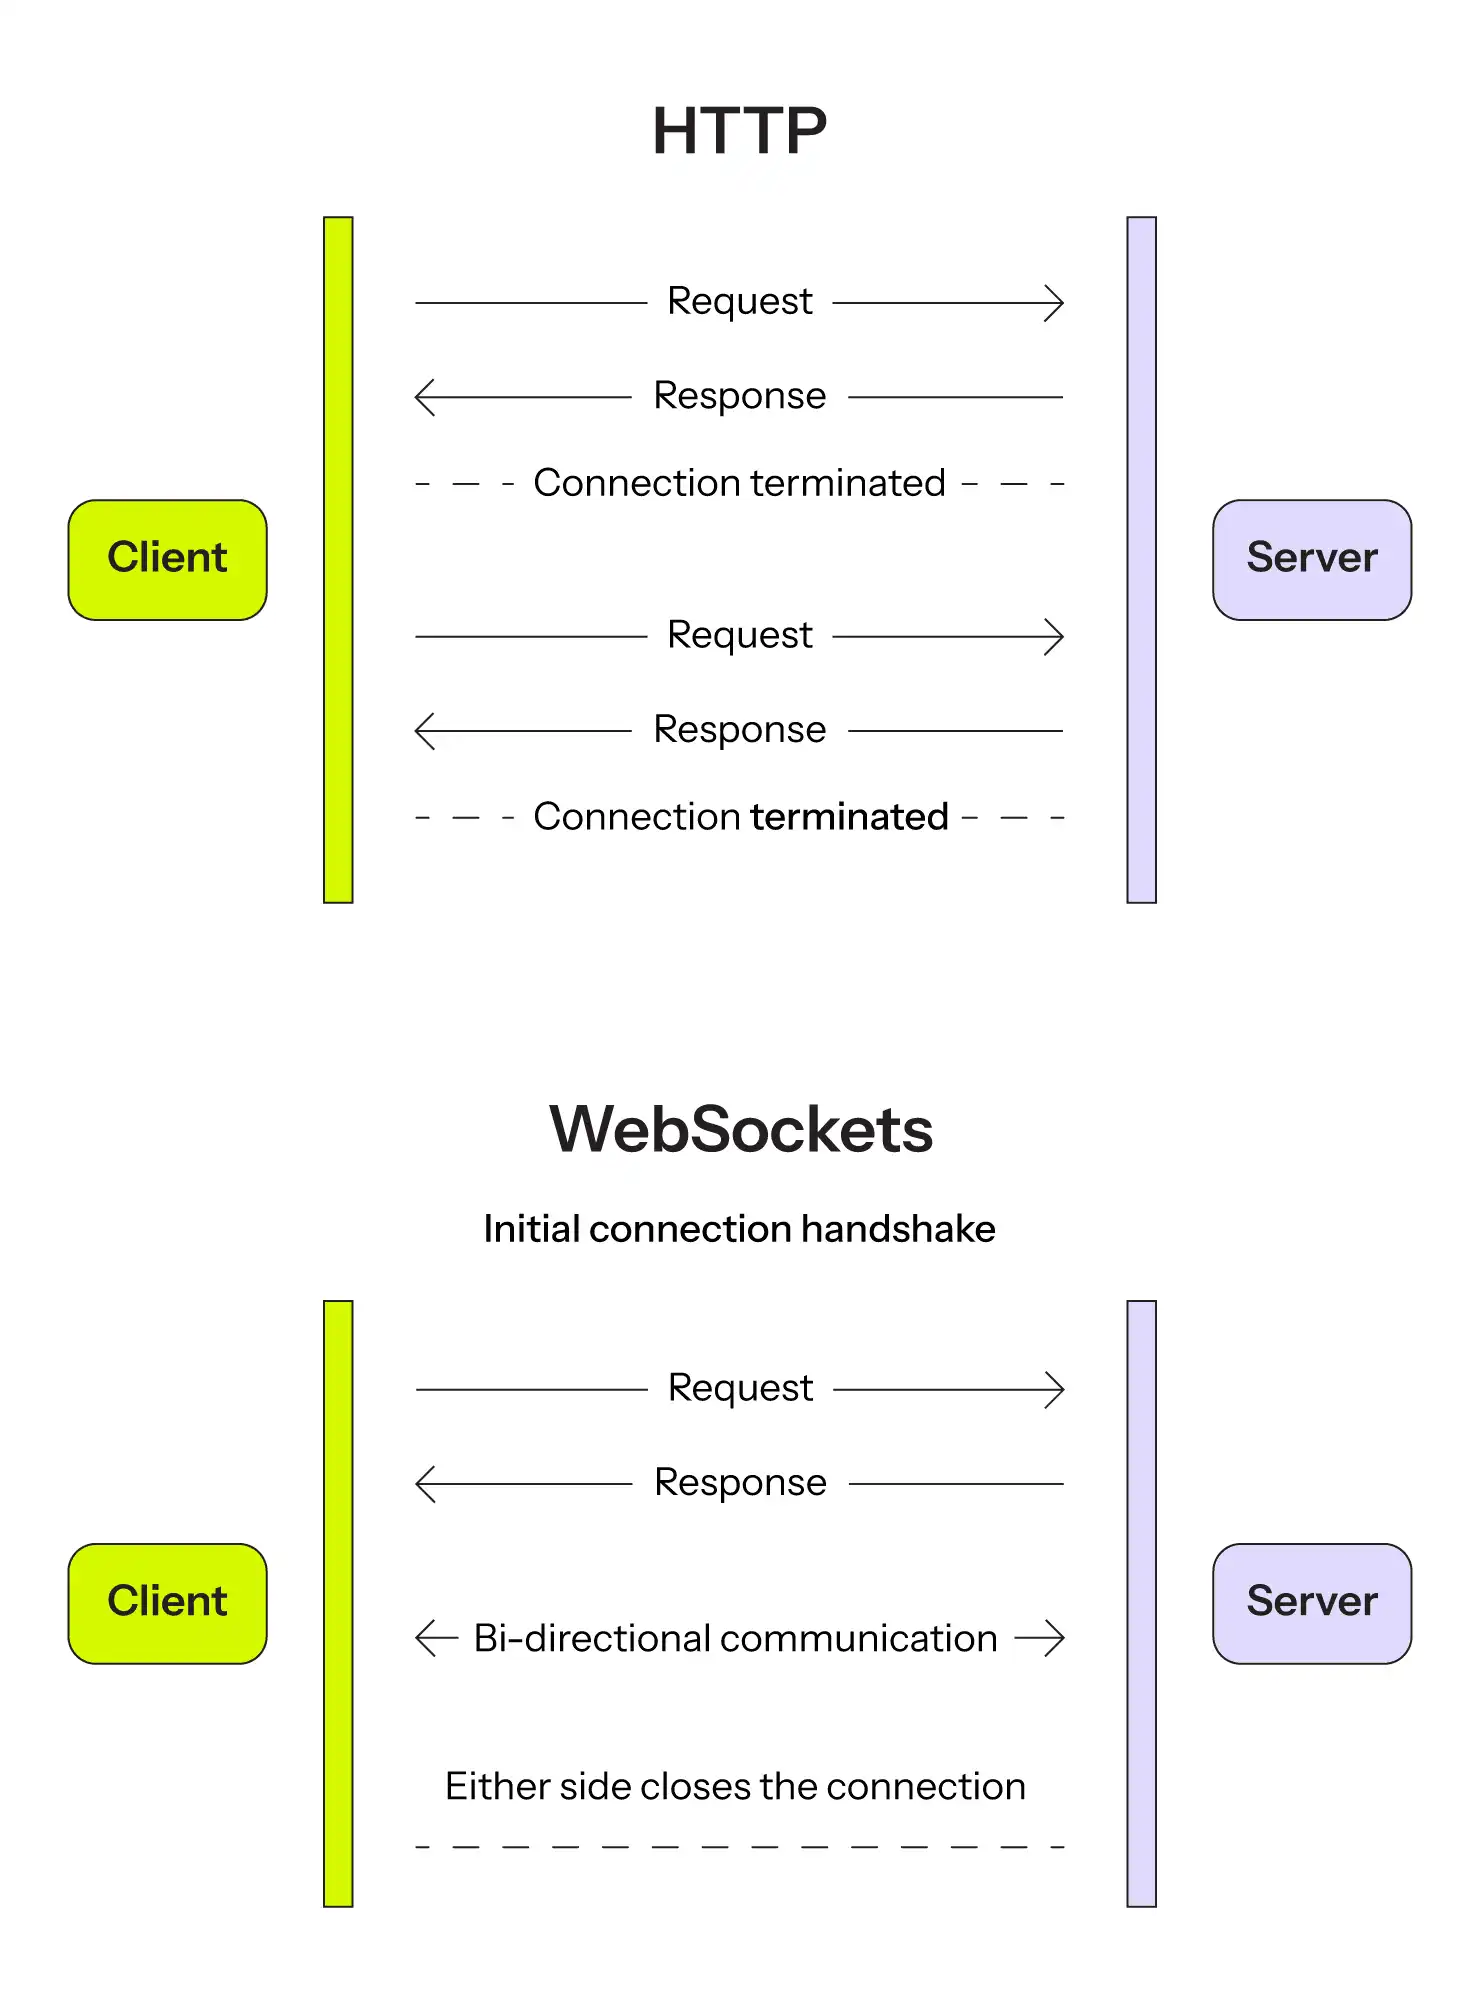
HTTP is widely used for server and client interactions. It works well in retrieving data and creating resources. But it's unidirectional, meaning the client must initiate all requests and the server cannot send data on its own. This limitation makes it inefficient for applications such as stock market tickers or multiplayer games, where you need to transfer updates between the client and server hundreds or thousands of times per minute. For each update, the client needs to repeat a request-response cycle, which takes a lot of compute resources and bandwidth. Using HTTP for such applications also makes the server inefficient because it is overloaded with new requests even when there is no update available for the clients.
To address this limitation, you can try HTTP long polling, where the server keeps the connection open longer while waiting to send more data with the response. As soon as the client gets the response, it makes a new request to ask for more data. While this works well to replicate real-time behavior, keeping a long-running connection open can cause server timeout issues and hinder performance if too many clients keep polling the server even when new updates aren't available. Additionally, because the client makes requests at predefined intervals, the updates may not appear instantly. For example, imagine a multiplayer video game that needs to sync player locations and scores in real time. HTTP would need to send a new request every few seconds to fetch the latest game state, which adds unnecessary network overhead and latency.
On the other hand, WebSockets provide much lower latency and network overhead while keeping a bidirectional channel for real-time communication. Using a full-duplex connection allows the client and server to interact and send messages without creating a new connection, which reduces the transmission overhead related to creating a new connection for each request. The persistent connection in WebSockets minimizes bandwidth usage by not sending the HTTP headers with each message. WebSockets also offer a more real-time feel to applications because they don't need to follow a polling cycle. Hence, new data arrives instantly as soon as it's available. All these benefits make WebSockets a much more practical option for real-time uses, such as chat and stock market applications, multiplayer games, and collaborative tools.
Here's a diagram comparing the HTTP and WebSockets connection timeline:

If you've ever built a chat feature using HTTP polling, you know the pain: users complaining about delayed messages, servers groaning under constant requests, and that sinking feeling when you realize your "real-time" app has a 5-second delay. WebSockets solve this elegantly by maintaining a persistent, bidirectional connection that feels truly instant.
Basics of the WebSocket protocol
The WebSocket protocol creates a persistent connection between the client and the server for bidirectional communication. The connection process starts with an HTTP request called a handshake, where the client requests the server to upgrade the connection to the WebSocket protocol. After the handshake, the connection shifts to the WebSocket protocol. The following diagram shows the connection sequence between the client and the server.

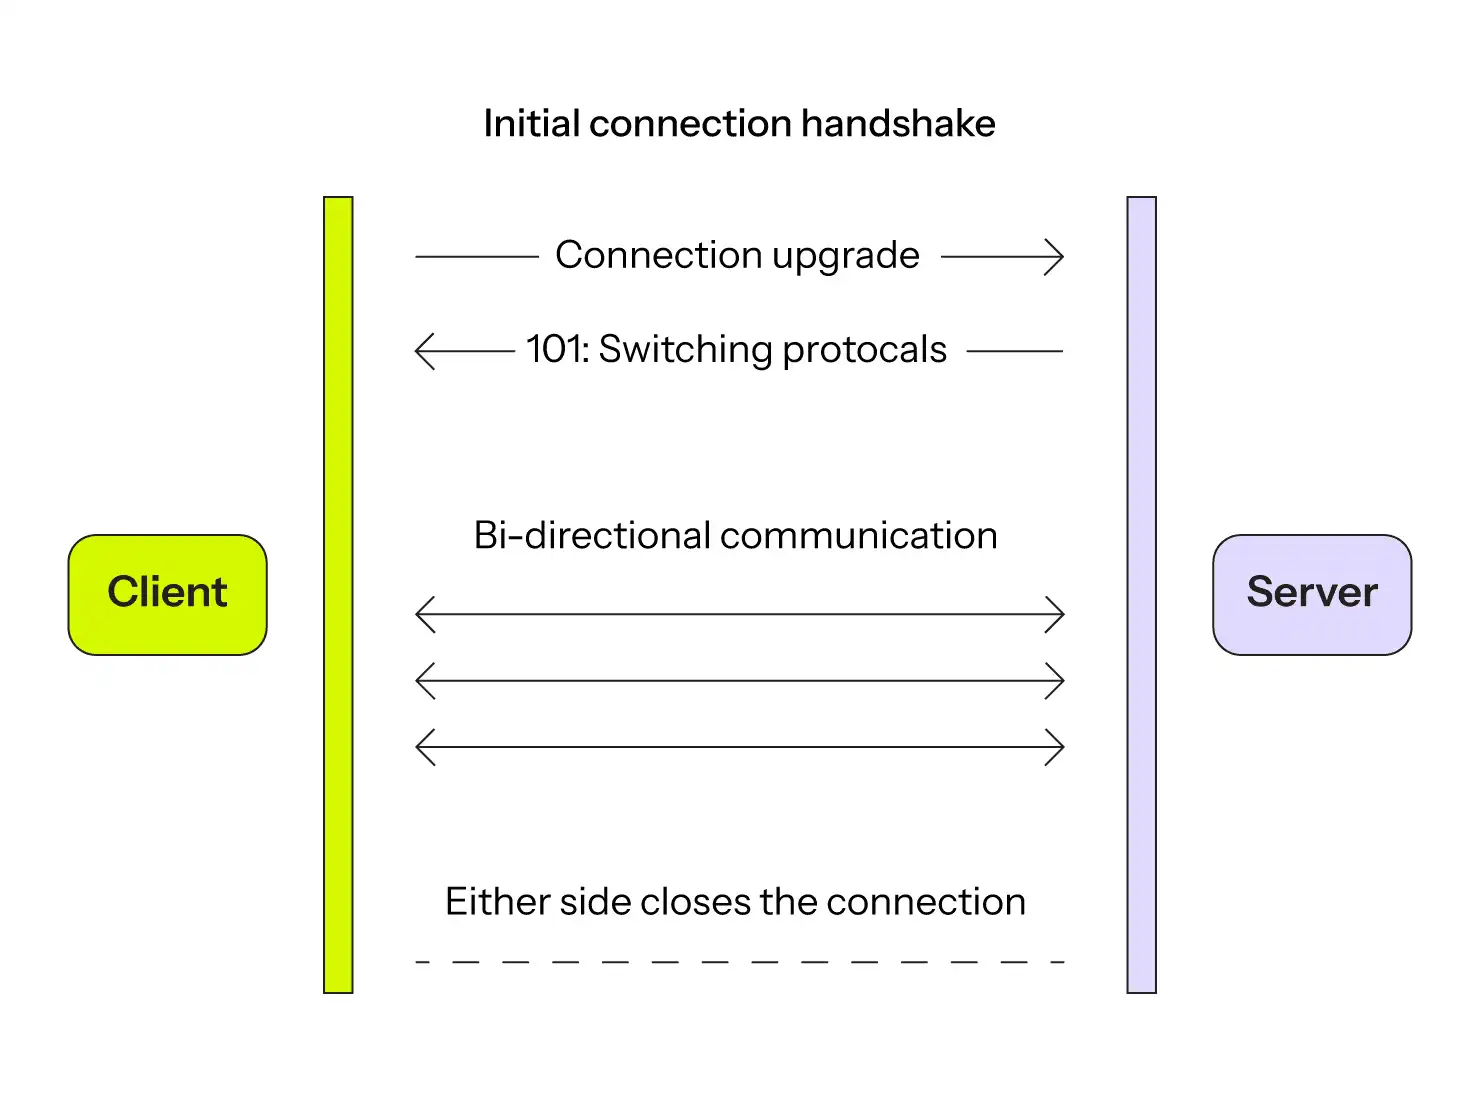
Here's how the WebSocket protocol connection works: The client sends an HTTP request to the server for a connection upgrade to the WebSocket protocol. The request includes Upgrade: websocket and Connection: Upgrade headers, as in the following example:
   GET /chat HTTP/1.1
    Host: example.com:8000
    Upgrade: websocket
    Connection: Upgrade
The server sends a response to the client with a 101 status code to indicate that the connection has been upgraded to the WebSocket protocol. The response includes Upgrade: websocket and Connection: Upgrade headers. Here's an example:
    HTTP/1.1 101 Switching Protocols
    Upgrade: websocket
    Connection: Upgrade
After the handshake, the client and the server can now communicate bidirectionally without any additional requests.
Either the client or the server can close the connection at any time.
Using WebSockets in the frontend
Next, we'll show you how to create a simple chat application using WebSockets that lets you send and receive messages. The frontend application will let the users send messages, and the backend server will broadcast the messages to all connected clients.
You can follow along using this GitHub repository.
To get started, create a project folder named websockets-js-node in your working directory by running mkdir websockets-js-node in your command line tool.
In the project folder, create a directory named frontend by running mkdir frontend in your command-line tool.
In the frontend directory, create a file named index.html by running touch index.html in your command-line tool.
In the index.html file, add the code to render a simple HTML page with input fields for the username and message, a button to send the message, and a script tag to include the index.js script file that implements the frontend WebSocket logic, as follows:
   <!-- frontend/index.html -->

   <!DOCTYPE html>
   <html lang="en">
     <head>
       <meta charset="UTF-8" />
       <meta http-equiv="X-UA-Compatible" content="IE=edge" />
       <meta name="viewport" content="width=device-width, initial-scale=1.0" />
       <title>WebSocket Client</title>
     </head>
     <body>
       <h1>WebSocket Client</h1>
       <input type="text" id="username" placeholder="Your username" />
       <input type="text" id="messageInput" placeholder="Type your message" />
       <button onclick="sendMessage()">Send</button>
       <div id="messages"></div>

       <script src="index.js"></script>
     </body>
   </html>
Create a file named index.js by running touch index.js in your command line tool, and add the following code to configure the WebSocket connection to the backend server:
   // frontend/script.js

   // Create a WebSocket connection to the server
   const socket = new WebSocket("ws://localhost:8080");

   // Display connection status
   socket.onopen = () => {
     console.log("Connected to the WebSocket server");
   };

   // Handle incoming messages from the server
   socket.onmessage = (event) => {
     const messageDiv = document.getElementById("messages");
     const newMessage = document.createElement("p");
     newMessage.textContent = event.data.toString();
     messageDiv.appendChild(newMessage);
   };

   // Handle connection closure
   socket.onclose = () => {
     console.log("Disconnected from the WebSocket server");
   };

   // Send a message to the server
   function sendMessage() {
     const usernameInput = document.getElementById("username");
     const messageInput = document.getElementById("messageInput");
     const message = messageInput.value;
     const username = usernameInput.value;
     if (message) {
       socket.send(`${username}: ${message}`);
       messageInput.value = "";
     }
   }
The code does the following:
- It creates a WebSocket connection to the backend server.
- The
socket.onopenevent is triggered when the connection is established. - The
socket.onmessageevent is triggered when a message is received from the server. It appends the message to themessagesdiv. - The
socket.oncloseevent is triggered when the connection is closed. - The
sendMessagefunction is called when the user clicks the Send button. It gets the username and message from the input fields and sends them to the server using thesocket.sendmethod.
Using WebSockets in the backend
Now that the frontend is ready, let's create a backend server that the frontend can connect with to send and receive messages. In the following section, we explain how to implement a simple chat application that broadcasts incoming messages to all connected clients.
For the backend implementation, this example uses the ws npm package, which is a battle-tested library for creating a WebSocket server in Node.js.
Note that the code examples in this tutorial are made using Node.js version 20.
In the project folder, create a new directory named backend by running mkdir backend in your command line tool. In the backend directory, create a file named server.js by running touch server.js in your command line tool.
Run the following command in your command line tool to install the ws package:
npm install ws
In the server.js file, add the following code to create a simple HTTP server and a WebSocket server using the HTTP server:
   // backend/server.js

   const http = require("http");
   const { WebSocketServer } = require("ws");

   // Create a simple HTTP server
   const server = http.createServer((req, res) => {
     res.writeHead(200, { "Content-Type": "text/plain" });
     res.end("WebSocket server is running.\n");
   });

   // Create a WebSocket server using the HTTP server
   const wss = new WebSocketServer({ server });

   wss.on("connection", (ws) => {
     console.log("New client connected");

     // Send a welcome message to the newly connected client
     ws.send("Server: Welcome to the WebSocket server!");

     // Listen for messages from the client
     ws.on("message", (message) => {
       // Broadcast the received message to all connected clients
       wss.clients.forEach((client) => {
         if (client.readyState === ws.OPEN) {
           client.send(message.toString());
         }
       });
     });

     // Handle client disconnection
     ws.on("close", () => {
       console.log("Client disconnected");
     });
   });

   // Start the HTTP and WebSocket server on port 8080
   server.listen(8080, () => {
     console.log("Server is running on http://localhost:8080");
   });
The server code does the following:
- The
on("connection")event is triggered when a new client connects to the WebSocket server. The server sends a welcome message to the newly connected client and starts listening for messages from the client. - The
on("message")event is triggered when a message is received from a client and the message is broadcast to all connected clients. - The
on("close")event is triggered when a client disconnects from the WebSocket server. - The
server.listen()method is used to start the HTTP and WebSocket server on port 8080.
To run the server, navigate to the backend directory and run node server.js in your command line tool. This will start the server and make it accessible for the frontend application at http://localhost:8080.
Open the frontend/index.html file in two web browser tabs to test the real-time chat application. Fill in the usernames and send messages from one tab, and they will appear in the other tab in real time.
The final result should look like this:
Production Considerations
While our example works great for development, production WebSocket applications need additional considerations like connection management, authentication, and handling network interruptions. Modern platforms like Upsun handle many of these concerns automatically, including load balancing WebSocket connections and managing SSL termination.
Take your WebSocket app to production
Building a WebSocket application is just the beginning; getting it running reliably in production is where things get interesting. You need to handle scaling when your chat app goes viral, debug performance issues in real-time connections, and test new features without breaking the live experience for your users.
This is where Upsun shines. As a developer-focused platform built for modern applications, Upsun makes deploying WebSocket apps refreshingly straightforward. Every Git push automatically creates a complete preview environment, including your WebSocket server, database, and all dependencies, so you can test real-time features with actual data before they hit production.
Plus, with built-in observability and performance monitoring, you can spot connection bottlenecks or message delivery issues before your users do. Whether you're building a simple chat app or a complex real-time collaboration tool, Upsun handles the infrastructure complexity so you can focus on what makes your application special.
Ready to see how easy WebSocket deployment can be? Start your free trial and have your real-time app running in minutes.
Your greatest work
is just on the horizon
CompareVercel alternativeAmazee alternativeHeroku alternativePantheon alternativeManaged hosting alternativeFly.io alternativeRender alternativeAWS alternativeAcquia alternativeDigitalOcean alternative
ProductOverviewSupport and servicesPreview environmentsMulti-cloud and edgeGit-driven automationObservability and profilingSecurity and complianceScaling and performanceBackups and data recoveryTeam and access managementCLI, console, and APIIntegrations and webhooksPricingPricing calculator
Use casesApplication modernizationeCommerce and CMS hostingMulti site managementCompliance and governanceDevOps and platform engineeringAI and automation
Join our monthly newsletter
Compliant and validated