





Mit dieser Schritt-für-Schritt-Anleitung möchten wir dir ein wenig verdeutlichen, wie du deine verschiedenen Anwendungsprojekte auf der Upsun Cloud hosten und konfigurieren kannst. Das Ziel ist es, deinem Team zu ermöglichen, sich mehr auf die Schaffung großartiger Benutzererlebnisse zu konzentrieren und weniger auf die Verwaltung der Infrastruktur für mehrere Anwendungen – und nebenbei geben wir dir noch ein paar Tipps zur Entwicklung mehrerer Anwendungen.
Wir betrachten das Ganze aus der Perspektive eines Kunden, der nach einem Hosting für mehrere Anwendungen mit einigen spezifischen Einschränkungen sucht. Diese Einschränkungen sind:
- Ein Backend, das die API Platform Admin-Komponente nutzt
- Ein Legacy-Frontend, das eine API und ein Unternehmens-Frontend hostet und mit Symfony 6.2 entwickelt wurde
- Ein mit Gatsby entwickeltes White-Label-Frontend, das die „Legacy“-API nutzt
- Ein Mercure Rocks-Server für Marketingzwecke (Push-Benachrichtigungen)
- Alle Kundenquellen in einem öffentlichen GitHub-Repo
So startest du das Hosting deines Multi-App-Projekts mit Upsun Cloud
Erstellen eines Forks des BigFoot-Multi-App-Repositorys
Um die folgenden Schritte in diesem Prozess ausführen zu können, musst du zunächst dein eigenes Repository – einen Fork – anhand eines Upsun-Cloud-Beispiels erstellen. Folge dazu einfach den Schritten in diesem GitHub-Artikel, um einen Fork von unserem BigFoot-Multi-App-Projekt in deine eigene GitHub-Organisation zu erstellen. Dieses BigFoot-Multi-App-Projekt verfügt über ein Backend mit API Platform, ein Frontend + API mit Symfony, ein White-Label-Frontend mit Gatsby und einen Mercure Rocks-Server.
Nachdem du deinen Fork erstellt hast, klone ihn lokal und öffne ihn in deiner bevorzugten integrierten Entwicklungsumgebung (IDE).
git clone https://github.com/<YourOrgName>/upsun_multi-app-example bigfoot-multiapp
cd bigfoot-multiapp
Denk dann daran, den Wert <YourOrgName> durch den Namen deiner eigenen GitHub-Organisation zu ersetzen.
Konfiguriere dein Projekt
Um dein Multi-Anwendungs-Projekt auf der Upsun Cloud zu hosten, ist eine YAML-Konfiguration – config.yaml—in deinem Quellcode erforderlich, um das Verhalten deiner Anwendung zu steuern. Diese YAML-Konfigurationsdatei befindet sich in einem .upsun/ Ordner im Stammverzeichnis deines Quellcodes, dessen Struktur wie folgt aussieht:
bigfoot-multiapp
├── .upsun
│   └── config.yaml
└── <project sources>
Um dein Multi-App-Projekt zu konfigurieren, gibt es ein paar grundlegende Regeln:
- Für Konfigurationsdateien wird das YAML-Format verwendet.
- Der Ordner „.upsun/“, der die Datei „config.yaml“ mit Routing, Diensten und der für alle Anwendungen gemeinsamen Konfiguration enthält, muss im Stammverzeichnis deines Projekts verbleiben.
- Jede App befindet sich in einem eigenen Ordner:
- admin: API Platform Admin-Komponente
- api: BigFoot-API und Standard-Frontend
- gatsby: Gatsby-Frontend
- mercure: Mercure Rocks Server
Die Upsun-YAML-Konfiguration befindet sich im .upsun/ Ordner und kann automatisch mit dem upsun project:init Befehl ausgefüllt werden, siehe unten:
├── .upsun
│   └── config.yaml
└── <project sources>
Dieser Befehl hat eine .upsun/config.yaml Datei, basierend auf deinem lokalen Stack, und sie enthält 3 YAML-Schlüssel auf oberster Ebene:
applications: Dieser enthält die Liste deiner Anwendungsdefinitionenservices: Hier findest du die Liste deiner Dienstdefinitionenroutes: Dieser enthält die Liste deiner Routendefinitionen
Erstelle die Datei „.upsun/config.yaml“
Um dein Projekt zu konfigurieren, musst du zunächst eine neue .upsun/config.yaml Datei mit den folgenden YAML-Schlüsseln auf oberster Ebene erstellen:
# .upsun/config.yaml
applications:
services:
routes:
Committe dann deine neu konfigurierte Datei:
git add .upsun/config.yaml
git commit -m "init Upsun configuration"
git push
Nun konfigurieren wir unsere vier Anwendungen nacheinander:
Die API-Anwendung konfigurieren
Zunächst müssen wir den applicationsoberste Schlüssel mit dem Verhalten unserer Symfony-BigFoot-Anwendung, die den Namen api.
# .upsun/config.yaml
# Complete list of all available properties: https://docs.upsun.com/create-apps/app-reference.html
applications:
  # A unique name for the app
  api:
    # Information on the app's source code and operations that can be run on it.
    source:
      # The path where the app code lives. Defaults to the directory of the .upsun/config.yaml file. Useful for multi-app setups.
      root: api
    # The runtime the application uses.
    type: php:8.3
    # The relationships of the application with services or other applications.
    relationships:
      database: "database:postgresql"
    # Mounts define directories that are writable after the build is complete. If set as a local source, disk property is required.
    mounts:
      "/var/cache": { source: storage, source_path: files/cache  }
      "/var/log": { source: storage, source_path: files/log  }
      "/var/sessions": { source: storage, source_path: files/sessions  }
      "/data": { source: storage, source_path: files/data  }
    # The web key configures the web server running in front of your app.
    web:
      # Each key in locations is a path on your site with a leading /.
      locations:
        "/":
          root: "public"
          passthru: '/index.php'
          index:
            - index.php
          scripts: true
          allow: true
          headers:
            Access-Control-Allow-Origin: "*"
    # Variables to control the environment.
    variables:
      env:
        APP_ENV: 'prod'
      php:
        assert.active: off
        #opcache.preload: config/preload.php
    # Specifies a default set of build tasks to run. Flavors are language-specific.
    build:
      flavor: composer
    # Installs global dependencies as part of the build process.
    # Hooks allow you to customize your code/environment as the project moves through the build and deploy stages
    hooks:
      # The build hook is run after any build flavor.
      build: |
        set -x -e
        curl -s https://get.symfony.com/cloud/configurator | bash
        symfony-build
      # The deploy hook is run after the app container has been started, but before it has started accepting requests.
      deploy: |
        set -x -e
        symfony-deploy
    # Scheduled tasks for the app.
    crons:
      update-sighting:
        spec: '*/5 * * * *'
        cmd: './bin/console app:update-sighting-scores'
      security-check:
        # Check that no security issues have been found for PHP packages deployed in production
        # See https://github.com/fabpot/local-php-security-checker
        spec: '50 23 * * *'
        cmd: if [ "$PLATFORM_ENVIRONMENT_TYPE" = "production" ]; then croncape php-security-checker; fi
    # Customizations to your PHP or Lisp runtime.
    runtime:
      extensions: [ ctype, iconv, apcu, mbstring, sodium, xsl, pdo_pgsql ]
Dir ist wahrscheinlich aufgefallen, dass unsere api Anwendung eine Beziehung zu einem Dienst namens database– siehe die YAML-Konfiguration unten. Das bedeutet, dass wir diesen Service database.
applications:
  api:
    ...
    relationships:
      database: "database:postgresql"
Da wir uns bereits in derselben .upsun/config.yaml Datei definieren wir diesen Dienst im services obersten YAML-Schlüssel:
# .upsun/config.yaml
applications:
  api: ...
# The services of the project.
#
# Each service listed will be deployed
# to power your Upsun project.
# More information: https://docs.upsun.com/add-services.html
# Full list of available services: https://docs.upsun.com/add-services.html#available-services
services:
  database:
    type: postgresql:15
Zuletzt müssen wir das Routing für unsere API-Anwendung in derselben .upsun/config.yaml Datei definieren; füge dazu Folgendes hinzu:
# .upsun/config.yaml
applications:
  api: …
services: …
routes:
  # BigFoot API
  https://{default}:
    type: upstream
    # the first part should be your project name
    upstream: "api:http"
    id: api
Anschließend müssen wir die für die API-Anwendung spezifischen Umgebungsvariablen für Upsun Cloud konfigurieren. Bitte erstelle eine Datei „api/.environment“. Wenn diese Datei vorhanden ist, wird sie in die Umgebung der Anwendung eingebunden.
# api/.environment
export N_PREFIX=$HOME/.n
export PATH=$N_PREFIX/bin:$PATH

# Set dynamic CORS_ALLOW_ORIGIN for NelmioBundle
export CORS_ALLOW_ORIGIN=.*$(echo $PLATFORM_PROJECT)..*.platformsh.site
export TRUSTED_HOSTS=.*$(echo $PLATFORM_PROJECT)..*.platformsh.site
export TRUSTED_PROXIES=.*$(echo $PLATFORM_PROJECT)..*.platformsh.site

# Admin Site Name
export API_SITE_NAME="API Platform"

export APP_SECRET=$(echo $PLATFORM_PROJECT_ENTROPY)

# Mercure Rocks uri
export MERCURE_URL=$(echo $PLATFORM_ROUTES | base64 --decode | jq -r 'to_entries[] | select(.value.id == "mercure") | .key'| awk '{print substr($0, 0, length($0))}')
export MERCURE_PUBLIC_URL=$(echo $PLATFORM_ROUTES | base64 --decode | jq -r 'to_entries[] | select(.value.id == "mercure") | .key'| awk '{print substr($0, 0, length($0))}')
export MERCURE_PUBLISH_URL=$(echo $PLATFORM_ROUTES | base64 --decode | jq -r 'to_entries[] | select(.value.id == "mercure") | .key'| awk '{print substr($0, 0, length($0))}')

# The secret used to sign the JWTs
export MERCURE_JWT_SECRET="!ChangeThisMercureHubJWTSecretKey!"
Anschließend kannst du deine Konfigurationsdatei in dein Git-Repository committen:
git add .upsun/config.yaml api/.environment
git commit -m "adding api configuration for Upsun"
git push
Konfiguriere die Admin-Anwendung
Als Nächstes müssen wir den applications Top-Level-Schlüssel mit dem Verhalten unserer API-Plattform-Admin-Komponente, die den Namen admin. Um deine Admin-Anwendung zu konfigurieren, füge den applications.admin Block in deine .upsun/config.yaml Datei ein:
# .upsun/config.yaml
applications:
  api: …
  # A unique name for the app
  admin:
    # Information on the app's source code and operations that can be run on it.
    source:
      # The path where the app code lives. Defaults to the directory of the .upsun/config.yaml file. Useful for multi-app setups.
      root: admin
    # The runtime the application uses.
    type: nodejs:20
    # How many resources to devote to the app. If not set, default to the predefined runtime definition.
    # For more information, please see https://docs.upsun.com/manage-resources/adjust-resources.html#advanced-container-profiles
    container_profile: BALANCED
    # Mounts define directories that are writable after the build is complete. If set as a local source, disk property is required.
    mounts:
      '/.tmp_platformsh': { source: "storage", source_path: "files/tmp_platformsh" }
      '/build': { source: "storage", source_path: "files/build" }
      '/.cache': { source: "storage", source_path: "files/.cache" }
      '/node_modules/.cache': { source: "storage", source_path: "files/node_modules/.cache" }
    # The web key configures the web server running in front of your app.
    web:
      # Each key in locations is a path on your site with a leading /.
      locations:
        "/admin":
          root: "build"
          passthru: "/admin/index.html"
          index:
            - "index.html"
          expires: 300s
          scripts: true
          allow: false
          rules:
            .(css|js|gif|jpe?g|png|ttf|eot|woff2?|otf|html|ico|svg?)$:
              allow: true
            ^/admin/robots.txt$:
              allow: true
            ^/admin/manifest.json$:
              allow: true
            ^/admin/_next:
              allow: true
            ^/admin/sitemap:
              allow: true
          headers:
            Access-Control-Allow-Origin: "*"
    # Variables to control the environment.
    variables:
      env:
        NODE_OPTIONS: '--max-old-space-size=1536'
    # Specifies a default set of build tasks to run. Flavors are language-specific.
    build:
      flavor: none
    # Hooks allow you to customize your code/environment as the project moves through the build and deploy stages
    hooks:
      # The build hook is run after any build flavor.
      build: |
        set -eu
        corepack yarn install --immutable --force
      # The post_deploy hook is run after the app container has been started and after it has started accepting requests.
      post_deploy: |
        corepack yarn build
Wie du wahrscheinlich bemerkt hast, ist das applications.admin.web.locations auf /admin. Das bedeutet, dass der Admin unter <defaultUrl>/admin. Wir müssen die entsprechende Route in derselben .upsun/config.yaml Datei, und zwar im routes YAML-Schlüssel auf oberster Ebene:
applications:
  api: ...
  admin: ...
services: ...
routes:
  # BigFoot API
  https://{default}: …

  # API Platform Admin component
  https://{default}/admin:
    type: upstream
    # the first part should be your project name
    upstream: "admin:http"
    id: "admin"
    cache:
      cookies: [ '*' ]
      default_ttl: 0
      enabled: true
      headers: [ Accept, Accept-Language ]
    ssi:
      enabled: false
Anschließend müssen wir die für Upsun spezifischen Umgebungsvariablen für die Admin-Anwendung konfigurieren, die das vorinstallierte Tool jq nutzt. Bitte erstelle eine Datei „admin/.environment“.
# admin/.environment
export REACT_APP_PUBLIC_URL=$(echo $PLATFORM_ROUTES | base64 --decode | jq -r 'to_entries[] | select(.value.id == "api") | .key')api
export PUBLIC_URL=$(echo $PLATFORM_ROUTES | base64 --decode | jq -r 'to_entries[] | select(.value.id == "admin") | .key')

# Admin Site Name
export REACT_APP_ADMIN_SITE_NAME="Admin API Upsun"
Anschließend kannst du deine Konfigurationsdatei in dein Git-Repository committen:
git add .upsun/config.yaml admin/.environment
git commit -m "adding admin configuration for Upsun"
git push
Konfiguriere die Gatsby-Anwendung
Als Drittes müssen wir den applications' Top-Level-Schlüssel entsprechend dem Verhalten unseres White-Label-Frontends – das gatsby— das mit dem Gatsby-Stack entwickelt wurde.
# .upsun/config.yaml
applications:
  api: ...
  admin: ...

  # A unique name for the app
  gatsby:
    # Information on the app's source code and operations that can be run on it.
    source:
      # The path where the app code lives. Defaults to the directory of the .upsun/config.yaml file. Useful for multi-app setups.
      root: gatsby
    # The runtime the application uses.
    type: 'nodejs:20'
    # How many resources to devote to the app. If not set, default to the predefined runtime definition.
    # For more information, please see https://docs.upsun.com/manage-resources/adjust-resources.html#advanced-container-profiles
    container_profile: BALANCED

    # Mounts define directories that are writable after the build is complete. If set as a local source, disk property is required.
    mounts:
      '/.cache': { source: "storage", source_path: "cache" }
      '/.config': { source: "storage", source_path: "config" }
      '/public': { source: "storage", source_path: "public" }
    # The web key configures the web server running in front of your app.
    web:
      # Each key in locations is a path on your site with a leading /.
      locations:
        '/site':
          root: 'public'
          index: [ 'index.html' ]
          scripts: false
          allow: true
    # Variables to control the environment.
    variables:
      env:
       NODE_OPTIONS: --max-old-space-size=1536
    # Specifies a default set of build tasks to run. Flavors are language-specific.
    build:
      flavor: none
    # Installs global dependencies as part of the build process.
    dependencies:
      nodejs:
        yarn: "1.22.17"
   # Hooks allow you to customize your code/environment as the project moves through the build and deploy stages
    hooks:
      # The build hook is run after any build flavor.
      build: |
        set -e
        yarn --frozen-lockfile
      # The post_deploy hook is run after the app container has been started and after it has started accepting requests.
      post_deploy: |
        yarn build --prefix-paths
Wie du wahrscheinlich bemerkt hast, ist das applications.gatsby.web.locations auf /site. Das bedeutet, dass Gatsby unter <defaultUrl>/site erreichbar ist und wir die entsprechende Route in derselben .upsun/config.yaml Datei, im routes YAML-Schlüssel auf oberster Ebene:
applications:
  api: ...
  admin: ...
services:
  ...
routes:
  # BigFoot API
  https://{default}: ...
  # API Platform Admin component
  https://{default}/admin: ...

  # Gatsby App
  https://{default}/site:
    type: upstream
    # the first part should be your project name
    upstream: "gatsby:http"
Die gatsby App nutzt unsere BigFoot-REST-API. Wenn du dir den gatsby Quellcode anschauen, findest du in der gatsby/gatsby-config.js Datei, findest du den Pfad zu deiner api App, indem du process.env.PLATFORM_ROUTES , was bedeutet, dass wir keine gatsby/.environment Datei benötigen, um diese Route zu finden. Du kannst dann deine Konfigurationsdatei in dein Git-Repository committen:
git add .upsun/config.yaml
git commit -m "adding gatsby configuration for Upsun"
git push
Konfiguriere die Mercure-Anwendung
Die von Les Tilleuls entwickelte API-Platform-Admin-Komponente kommuniziert mit einem Mercure.rocks-Server – einem Go-Stack, der für die Echtzeit-Push-Kommunikation verwendet wird. Wir müssen den applications Top-Level-Schlüssel so, dass er sich wie ein eigenständiger Mercure.rocks-Server verhält, und zwar mit dem Namen mercure.
# .upsun/config.yaml
applications:
  api: ...
  admin: ...
  gatsby: ...

  # A unique name for the app
  mercure:
    # Information on the app's source code and operations that can be run on it.
    source:
      # The path where the app code lives. Defaults to the directory of the .upsun/config.yaml file. Useful for multi-app setups.
      root: mercure/.config
    # The runtime the application uses.
    type: golang:1.21
    # Mounts define directories that are writable after the build is complete. If set as a local source, disk property is required.
    mounts:
      "database": { source: "storage", source_path: "database" }
      "/.local": { source: "storage", source_path: ".local" }
      "/.config": { source: "storage", source_path: ".config" }
    # The web key configures the web server running in front of your app.
    web:
      # Commands are run once after deployment to start the application process.
      commands:
        # The command to launch your app. If it terminates, it's restarted immediately.
        start: ./mercure run --config Caddyfile.upsun
    # Each key in locations is a path on your site with a leading /.
    locations:
      /:
        passthru: true
        scripts: false
        allow: true
        request_buffering:
          enabled: false
        headers:
          Access-Control-Allow-Origin: "*"
    # Variables to control the environment.
    variables:
      env:
        MERCUREVERSION: 0.14.4
        SERVER_NAME: ":8888"
        MERCURE_TRANSPORT_URL: "bolt:///var/run/mercure.db?size=1000&cleanup_frequency=0.5"
        MERCURE_EXTRA_DIRECTIVES: |
          cors_origin *
          publish_origins *
          subscriptions
          demo
        GLOBAL_OPTIONS: |
          auto_https off
        MERCURE_PUBLISHER_JWT_KEY: "!ChangeThisMercureHubJWTSecretKey!"
        MERCURE_SUBSCRIBER_JWT_KEY: "!ChangeThisMercureHubJWTSecretKey!"
    # Specifies a default set of build tasks to run. Flavors are language-specific.
    build:
      flavor: none
    # Hooks allow you to customize your code/environment as the project moves through the build and deploy stages
    hooks:
      # The build hook is run after any build flavor.
      build: |
        # Install Mercure using cache
        FILE="mercure_${MERCUREVERSION}_Linux_x86_64.tar.gz"
        if [ ! -f "$PLATFORM_CACHE_DIR/$FILE" ]; then
          URL="https://github.com/dunglas/mercure/releases/download/v${MERCUREVERSION}/$FILE"
          wget -O "$PLATFORM_CACHE_DIR/$FILE" $URL
       else
         echo "Found $FILE in cache, using cache"
       fi
       file $PLATFORM_CACHE_DIR/$FILE
       tar xvzf $PLATFORM_CACHE_DIR/$FILE
Für das Routing der Mercure-App verwenden wir eine Subdomain der Standard-URL deiner Umgebung (um die Erkennung des Upsun-Routings abzuschließen). Das bedeutet, dass die Mercure-App unter mercure.<defaultUrl>.
Also müssen wir die entsprechende Route in derselben .upsun/config.yaml Datei im routes obersten YAML-Schlüssel:
applications:
  api: ...
  admin: ...
  gatsby: ...
  mercure: ...
services: ...
routes:
  # BigFoot API
  https://{default}: ...
  # API Platform Admin component
  https://{default}/admin: ...
  # Gatsby App
  https://{default}/site: ...

  # Mercure Rocks app
  https://mercure.{default}:
    type: upstream
    # the first part should be your project name
    upstream: "mercure:http"
    cache:
      enabled: false
Anschließend kannst du deine Konfigurationsdatei in dein Git-Repository committen:
git add .upsun/config.yaml
git commit -m "adding mercure configuration for Upsun"
git push
Et voilà, dein Projekt ist bereit, auf Upsun hochgeladen zu werden! Das Endergebnis einer .upsun/config.yaml Datei hier als Referenz ansehen.
Erstelle ein Upsun-Cloud-Projekt
Der nächste Schritt beim Einrichten dieses Multi-App-Projekts auf Upsun Cloud ist das Erstellen eines Projekts, was ganz einfach über die Konsole geht. Klicke auf der Startseite deiner Konsole (Alle Projekte) oben rechts auf die Schaltfläche „Projekt erstellen“, wie unten zu sehen:


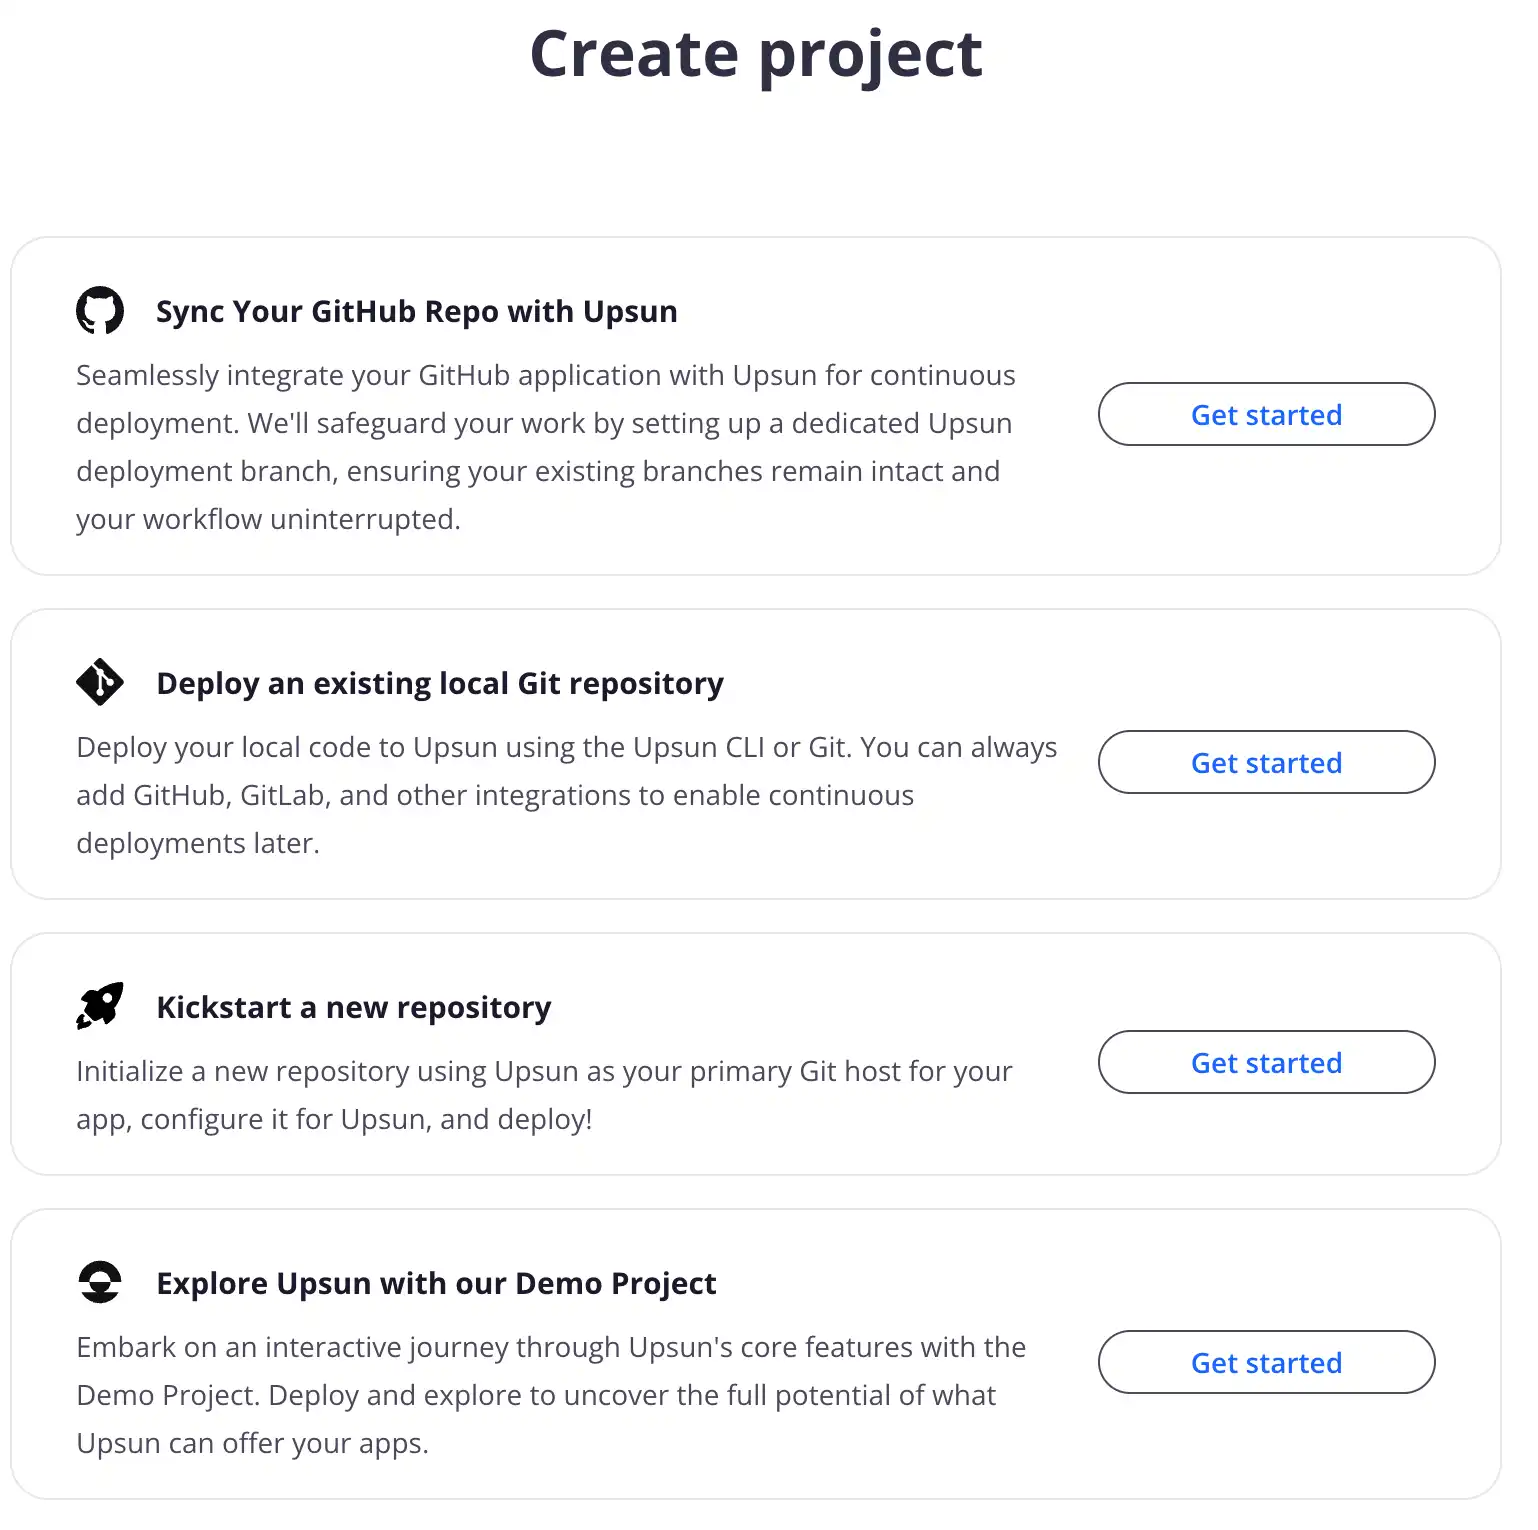
Falls du noch keine Organisation erstellt hast, in die du das Projekt einordnen möchtest, wirst du zunächst aufgefordert, eine anzulegen. Sobald du dies getan hast, wähle diese Organisation aus der Dropdown-Liste aus und wähle dann „Dein GitHub-Repo mit Upsun synchronisieren“, wie auf dem Bildschirm unten zu sehen:

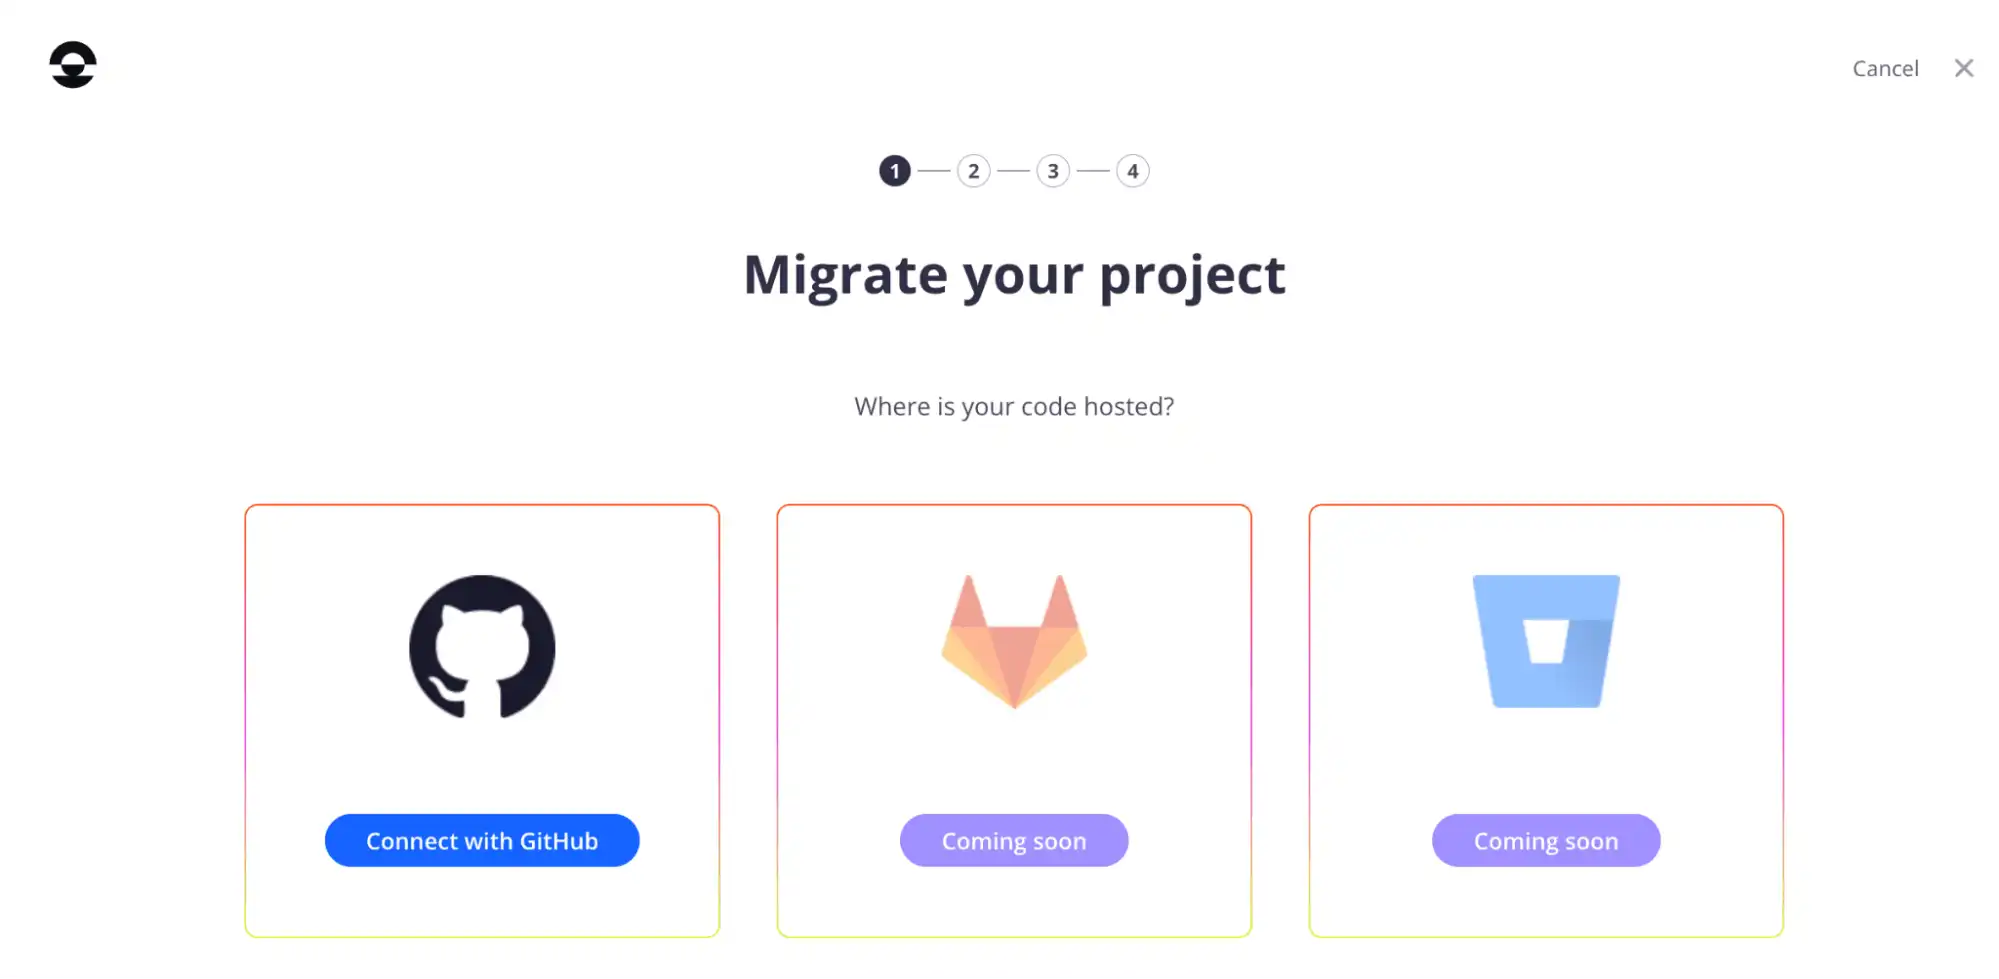
Wähle dann aus den angezeigten Optionen „Mit GitHub verbinden“ aus, wie hier zu sehen:

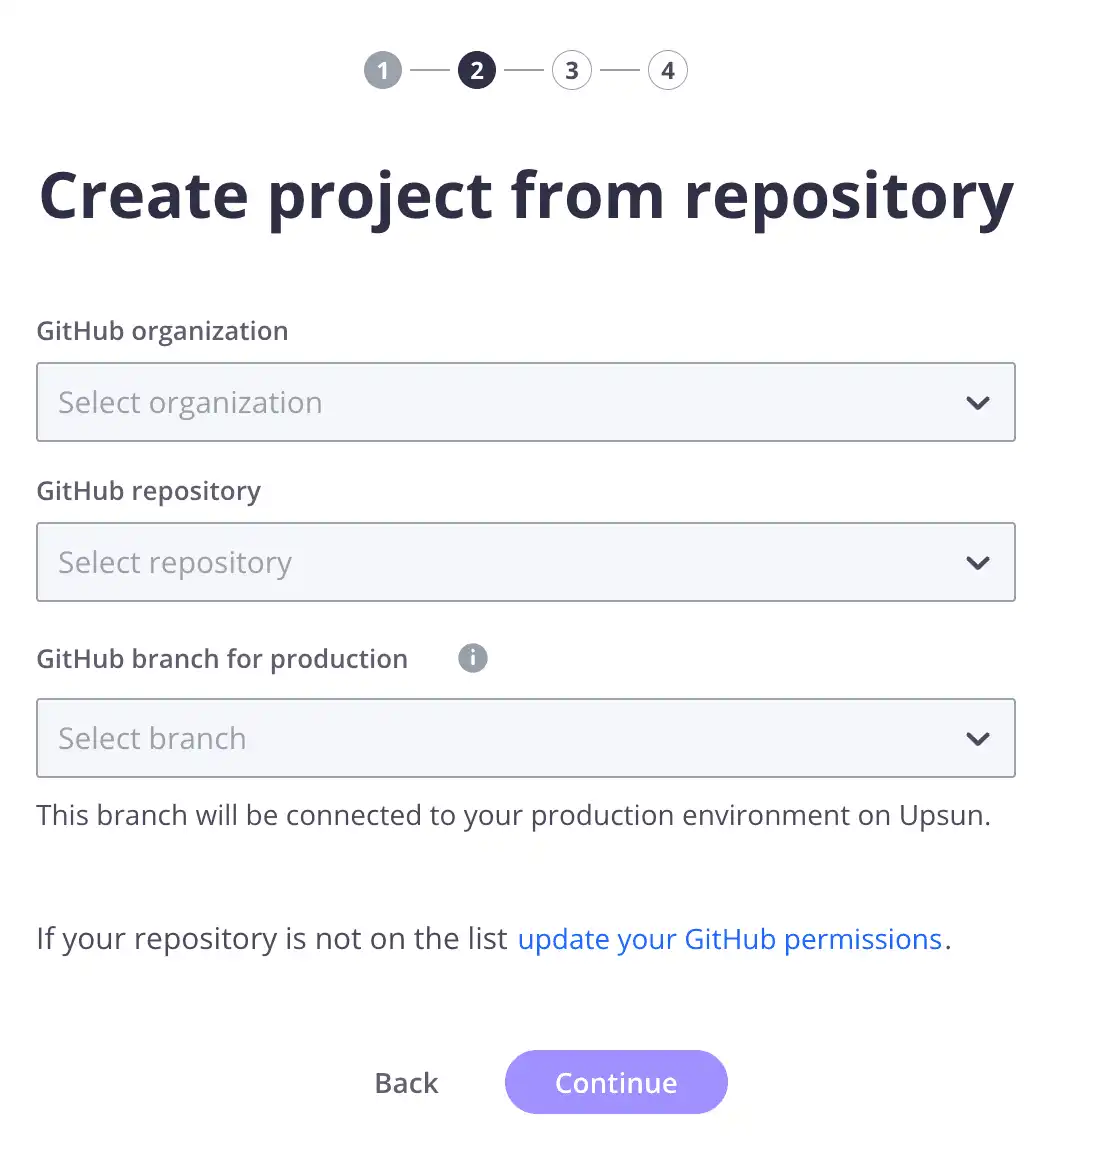
Im nächsten Formular, das wie im folgenden Screenshot zu sehen ist, wähle deine GitHub-Organisation aus dem ersten Dropdown-Menü aus, klicke dann auf „Installieren und autorisieren“ und gib deine GitHub-Anmeldedaten ein. Du musst deine GitHub-Organisation, das zuvor erstellte GitHub-Repo sowie den Produktions-Branch auswählen und dann auf „Weiter“ klicken.

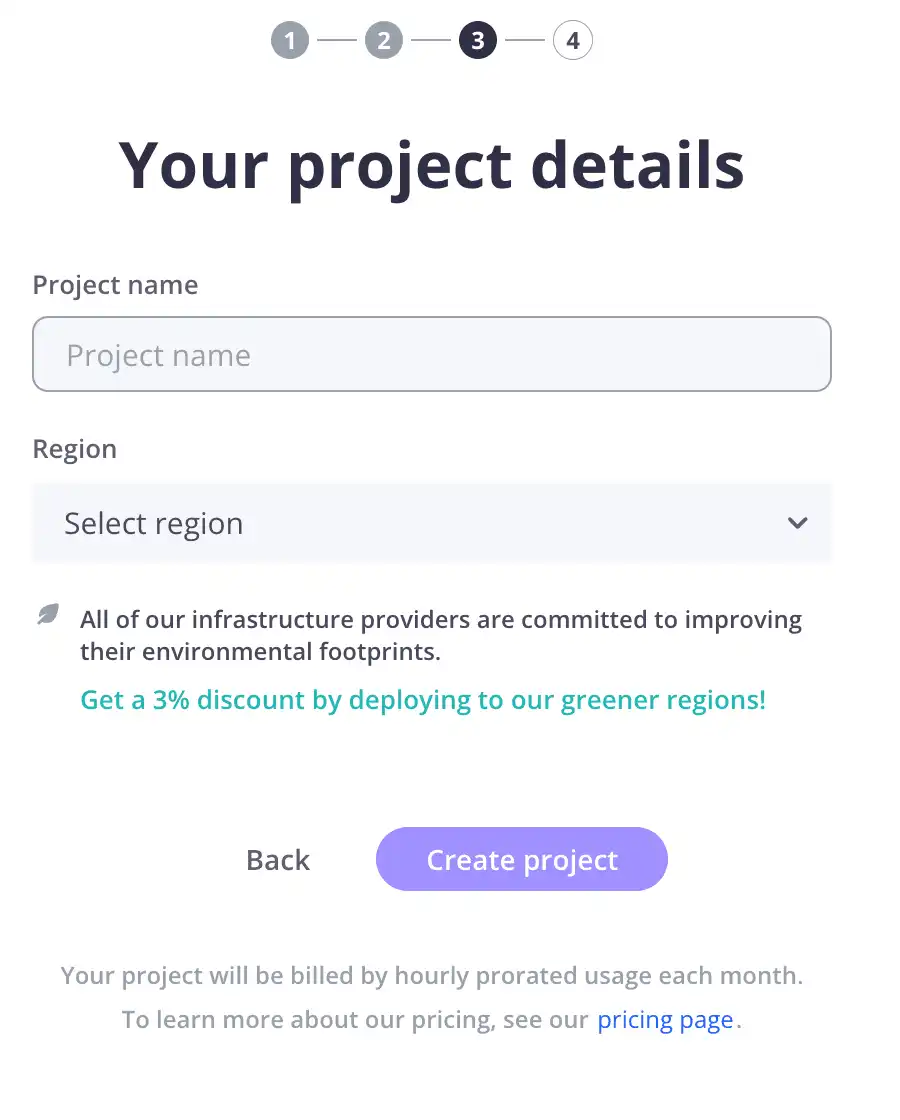
Anschließend gelangst du zu Schritt drei dieser Einrichtung – wie unten zu sehen –, wo du verschiedene Angaben wie Projektname, Umgebungsname und Region eingibst. Sobald du dies getan hast, wähle „Projekt erstellen“ aus.

Auf der nächsten Seite, während der Projektanlegevorgang im Hintergrund läuft, siehst du auf der linken Seite weitere Einrichtungsanweisungen, falls du diese benötigst. Auf der rechten Seite kannst du den Projektanlegevorgang verfolgen und wirst informiert, sobald er abgeschlossen ist, wie auf dem Bildschirm unten zu sehen ist:

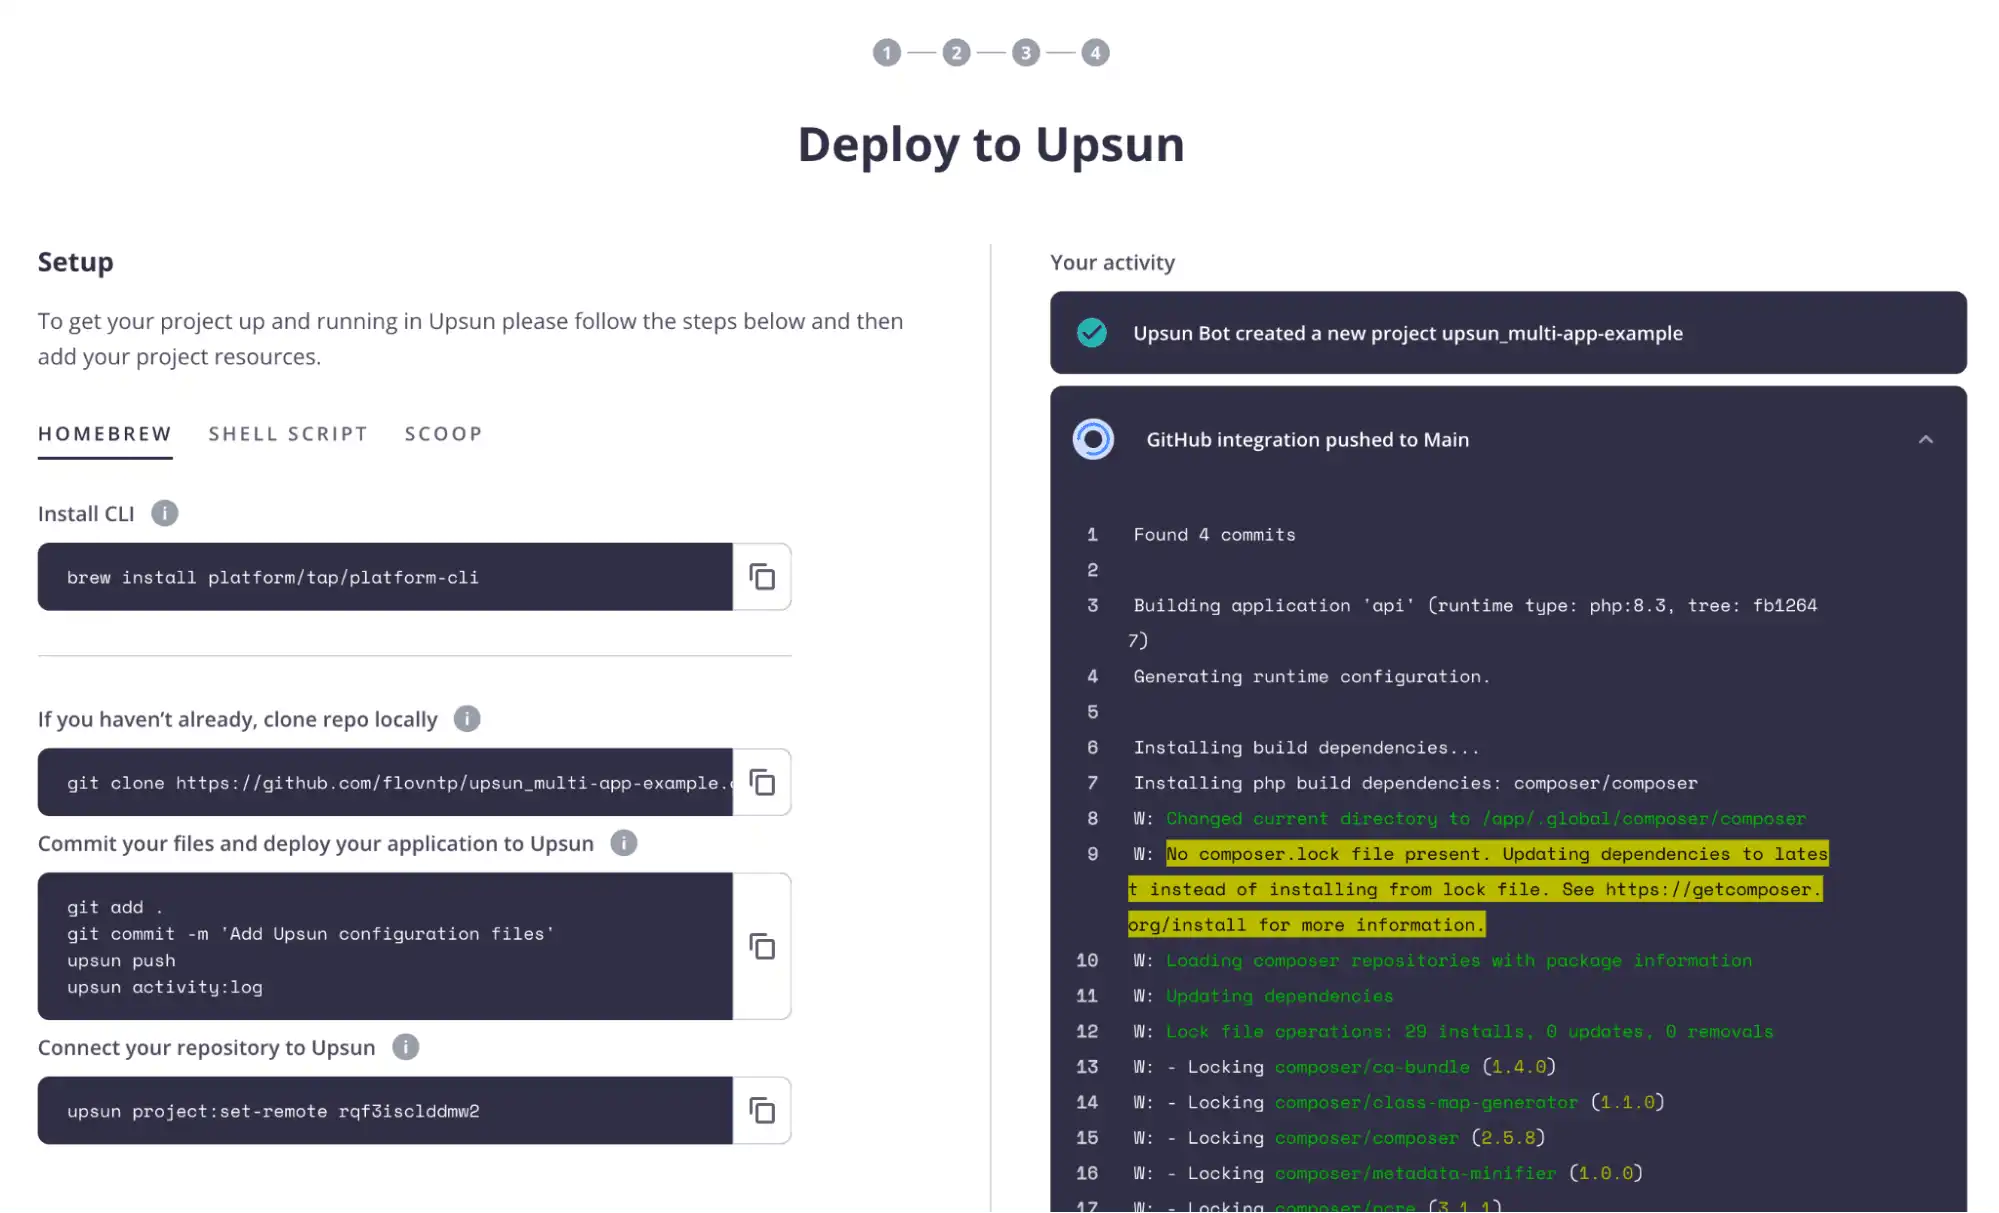
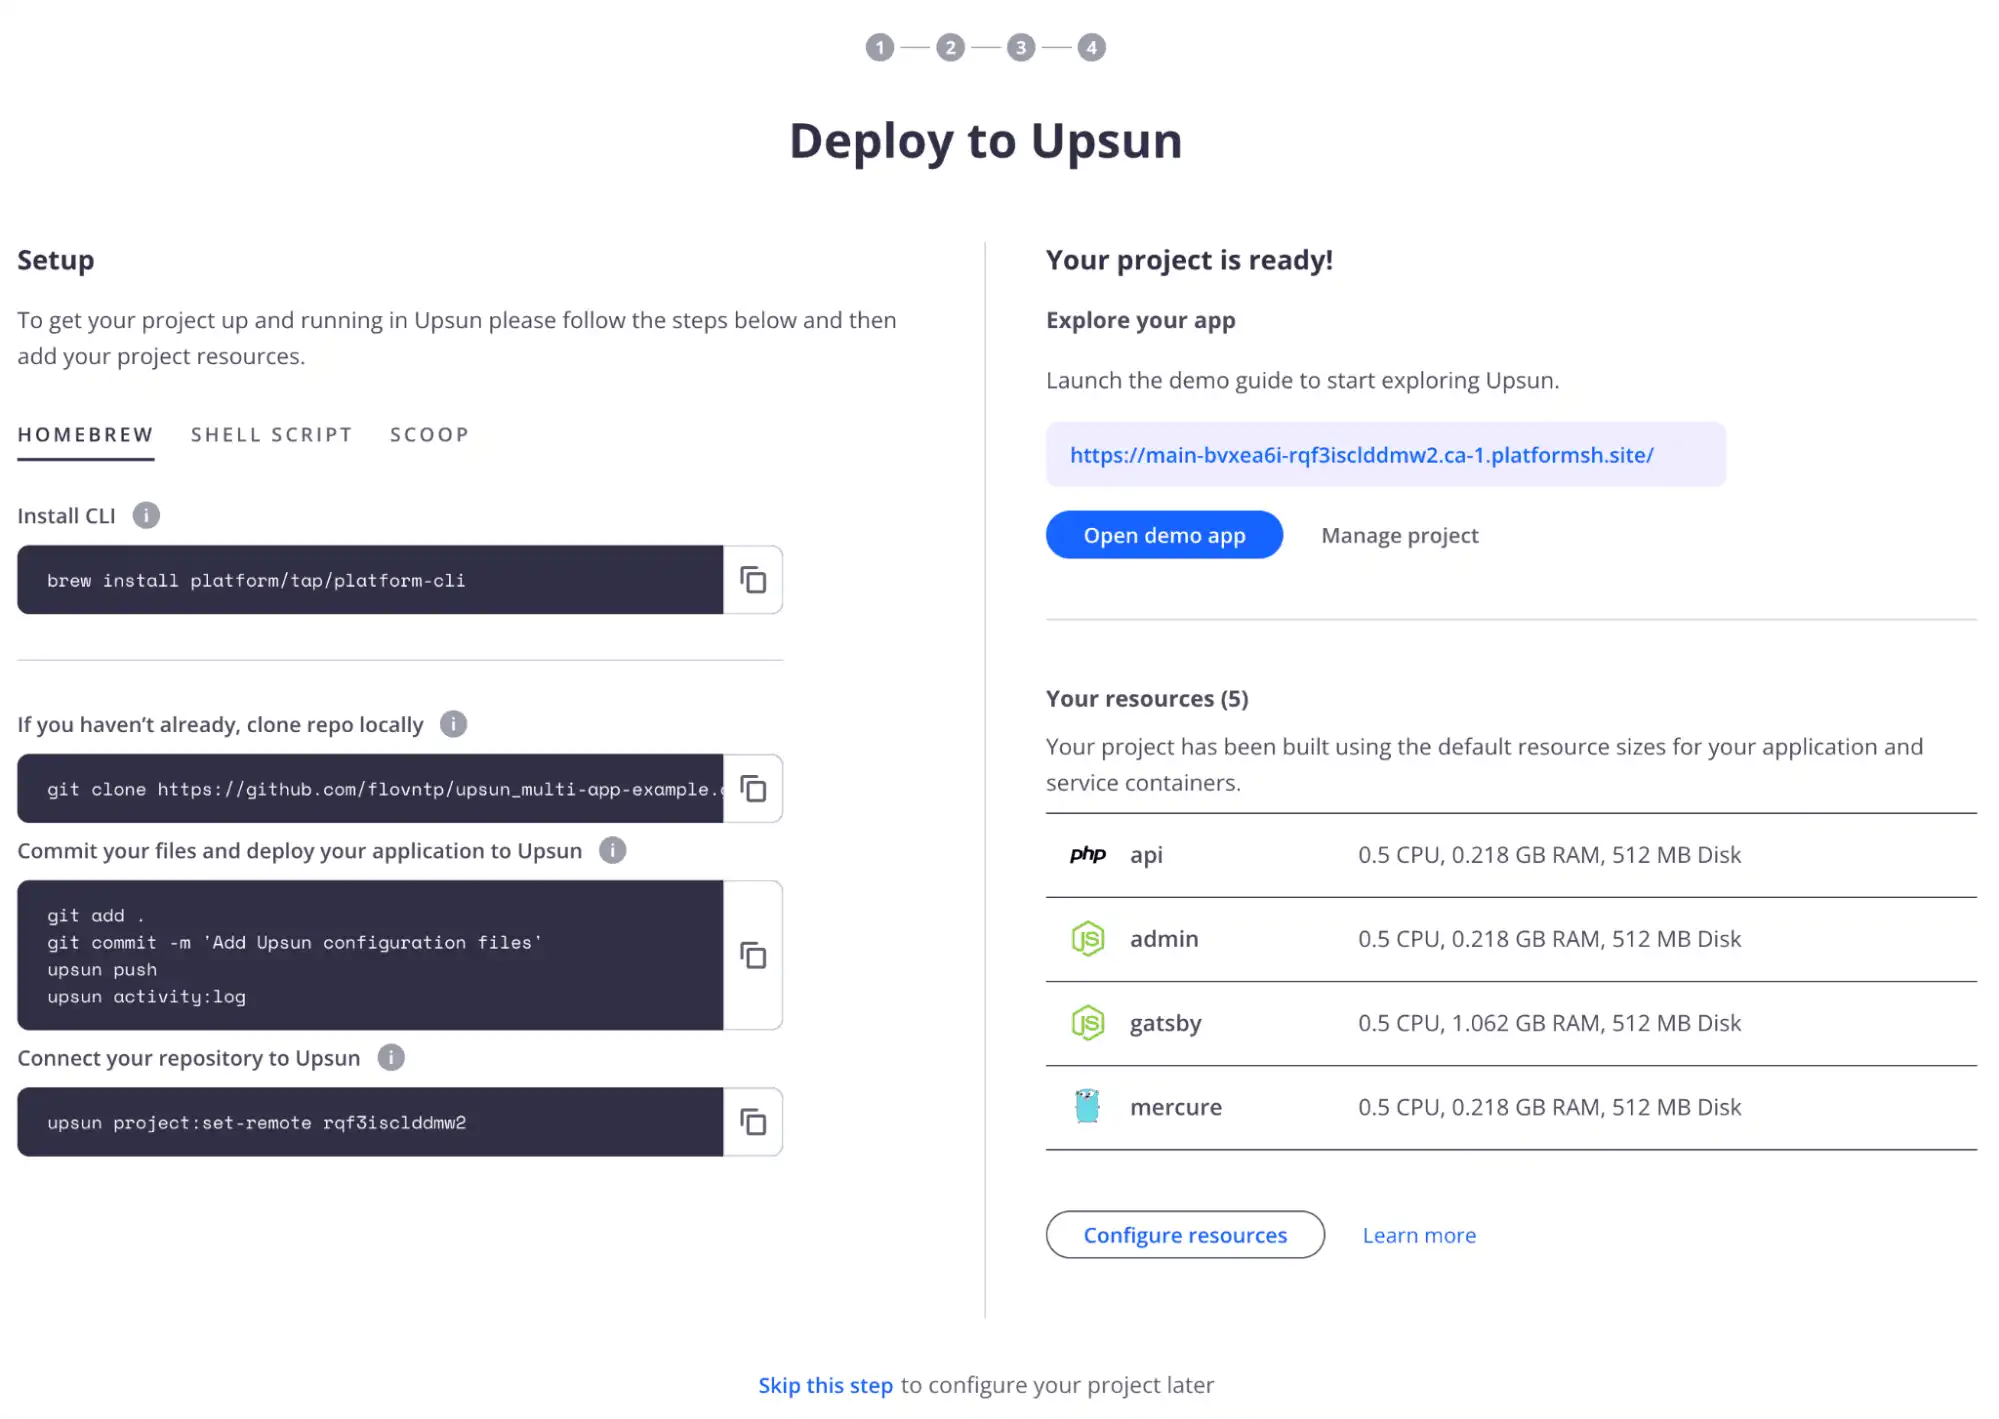
Sobald dein Projekt erstellt wurde, stellt die GitHub-Integration deine Anwendung automatisch auf Basis des Quellcodes aus deinem GitHub-Repository bereit. Warte, bis die Integration die Bereitstellung abgeschlossen hat – anschließend werden deine Anwendungsinformationen angezeigt, wie im folgenden Screenshot zu sehen ist:

Zeit für den Deployment, oder?
Und schon ist es Zeit für den Deployment! Aber Moment mal…
Da du bereits im Abschnitt zur Projektkonfiguration dieses Leitfadens sichergestellt hast, dass dein Quellcode Upsun-fähig ist, wurde dein Projekt bei der Erstellung automatisch bereitgestellt und deine Anwendung ist bereits live – eine separate Bereitstellung ist nicht erforderlich. Schau dir die URL deines neuen Projekts unten in der Konsolenoberfläche an.
Der nächste Schritt ist der Zugriff auf deine Projektkonsole, indem du unten auf der Einrichtungsseite auf die Schaltfläche „Projekt anzeigen“ klickst – et voilà, dein Projekt mit mehreren Anwendungen ist live und du kannst damit herumspielen und jede Menge coole neue Features hinzufügen!
Richte einen Remote für dein Upsun-Cloud-Projekt ein
Um die Interaktion von deinem Terminal aus mit deinem Upsun-Projekt zu vereinfachen, musst du mit diesem CLI-Befehl einen Remote einrichten:
upsun project:set-remote <projectID>Füge die Daten ein
Die Bigfoot-App (API-App) enthält Testdaten, die in die Datenbank eingefügt werden können. Führe dazu die folgenden Befehle aus:
upsun ssh --app=api "php bin/console d:s:u --dump-sql --force"
upsun ssh --app=api "php bin/console d:f:load -e dev"
Die bereitgestellten Websites anzeigen
Dein Projekt mit mehreren Anwendungen ist nun live und du solltest es testen. Um eine deiner Websites zu öffnen, kannst du entweder die Konsolenoberfläche nutzen oder den folgenden CLI-Befehl ausführen und dann eine der aufgeführten Routen auswählen:
upsun environment:urlEine Staging-Umgebung erstellen
Um eine neue Umgebung in unserem Projekt zu erstellen, müssen wir einen neuen Git-Zweig anlegen, ihn in das GitHub-Repository pushen, woraufhin der GitHub-Integrationsprozess die Umgebung automatisch erstellt. Führe dazu die folgenden Befehle aus:
git checkout -b staging
git push --set-upstream origin staging
Denk daran: Jedes Mal, wenn du einen neuen Git-Zweig erstellst und pushst, generiert die GitHub-Integration eine neue inaktive Umgebung innerhalb deines Upsun-Projekts. Da die Umgebung standardmäßig inaktiv ist, musst du sie aktivieren, um sie bereitzustellen. Gehe dazu wie folgt vor:
upsun environment:info type staging
upsun environment:activate stagingEine Entwicklungsumgebung erstellen
Jetzt ist es an der Zeit, eine neue Entwicklungsumgebung zu erstellen, indem du aus der Staging-Umgebung einen neuen Git-Zweig erstellst. Gehe dazu wie folgt vor:
git checkout -b dev
git push --set-upstream origin dev
Denk daran: Jedes Mal, wenn du einen neuen Git-Zweig erstellst und pushst, generiert die GitHub-Integration eine neue inaktive Umgebung innerhalb deines Upsun-Cloud-Projekts. Da die Umgebung standardmäßig inaktiv ist, musst du sie aktivieren, um sie bereitzustellen:
upsun environment:info type development
upsun environment:activate dev
Und die Git-Anleitungen gehen noch weiter – seid gespannt auf unseren nächsten Artikel über Git-Submodule, der schon bald erscheint. Bleibt über unsere Social-Media- und Community-Kanäle auf dem Laufenden: Dev.to, Reddit und unsere Community.
Deployments leicht gemacht.
Testen Sie Upsun kostenlos.
Bleiben Sie auf dem Laufenden
Upsun Cloud: compliant and validated